

Before & After Photos
Click on a photo to enlarge.
Replacement of Entrance Door


The front door at this home became part of a much larger water-damage remodel after a pipe burst and affected the interior. Moisture caused the wooden door frame to swell, and the existing entrance stopped functioning properly. The Before photo shows a traditional reddish-brown wood door with decorative glass and a separate arched transom above it. From the outside, the entry still has a finished appearance, but the operating problem had become significant enough that replacement was included in the restoration work.
Door problems are especially noticeable because homeowners use the entrance repeatedly. A swollen frame can turn a routine action—opening and closing the front door—into a daily frustration. In this project, the issue was tied directly to the water event rather than to a purely decorative decision. That connection is why the replacement belongs naturally within the broader interior remodeling work that followed the burst pipe.
The brick opening provides a strong reference for comparing the old and new designs. It remains unchanged, including the arched surround and decorative side glazing.
In the After photo, a dark arched-top door with a tall frosted-glass panel now fills the entry. Because the masonry framing is the same, the change in the door itself becomes more pronounced. The new design simplifies the visual center of the entrance while keeping the established brick architecture around it.
Function was the reason the door entered the project, but appearance became part of the transformation. The old reddish wood and separate upper transom created one type of front-entry composition. The darker replacement and tall glass panel create another. That difference illustrates how restoration work can sometimes lead to an updated design when a damaged or poorly functioning component has to be replaced anyway. The project did not begin with a style-only request; the style change happened within a necessary replacement.
For homeowners, an exterior door sits at the boundary between interior and exterior work. It has to fit the wall opening, meet the surrounding trim and masonry, and operate as an everyday access point. When water damage affects the frame, the issue can no longer be considered only from inside the room. The Wylie-area project shows that overlap clearly: a burst-pipe restoration reached all the way to the front entrance and resulted in a visibly different door system.
Local homeowners reviewing remodeling services in Wylie can see how one damaged component may become a focused project inside a larger restoration. The photos do not need to show the entire water-loss scope to make the door transformation understandable. The brick opening stays fixed, the old wood entry provides the starting point, and the dark glazed replacement supplies the finished comparison.
The tall frosted panel is especially important to the final appearance because it changes the balance of solid and glazed surface across the door. Instead of the warmer wood-dominant look in the Before image, the After view has a darker, more contemporary center framed by the same brick. The tall frosted panel becomes the main visual feature of the new entry, framed by the same brick and side glazing.
The existing brick surround and side glazing also show how much of the entrance was preserved. Those fixed elements frame both photographs, so the new door had to become the updated center of an established opening rather than part of a rebuilt facade. The comparison is therefore very focused: masonry, side glass, and the arched outline remain familiar while the main door changes from reddish wood to a dark glazed design.
More Before & After remodeling projects may focus on floors, kitchens, or other rooms. This one closes on a single everyday feature that stopped functioning properly after water damage. The swollen-frame problem led to replacement, and the final dark glass door gives the brick entrance a renewed appearance while returning the project focus to a completed, operable front entry.
Metal Roofing in Wylie, TX
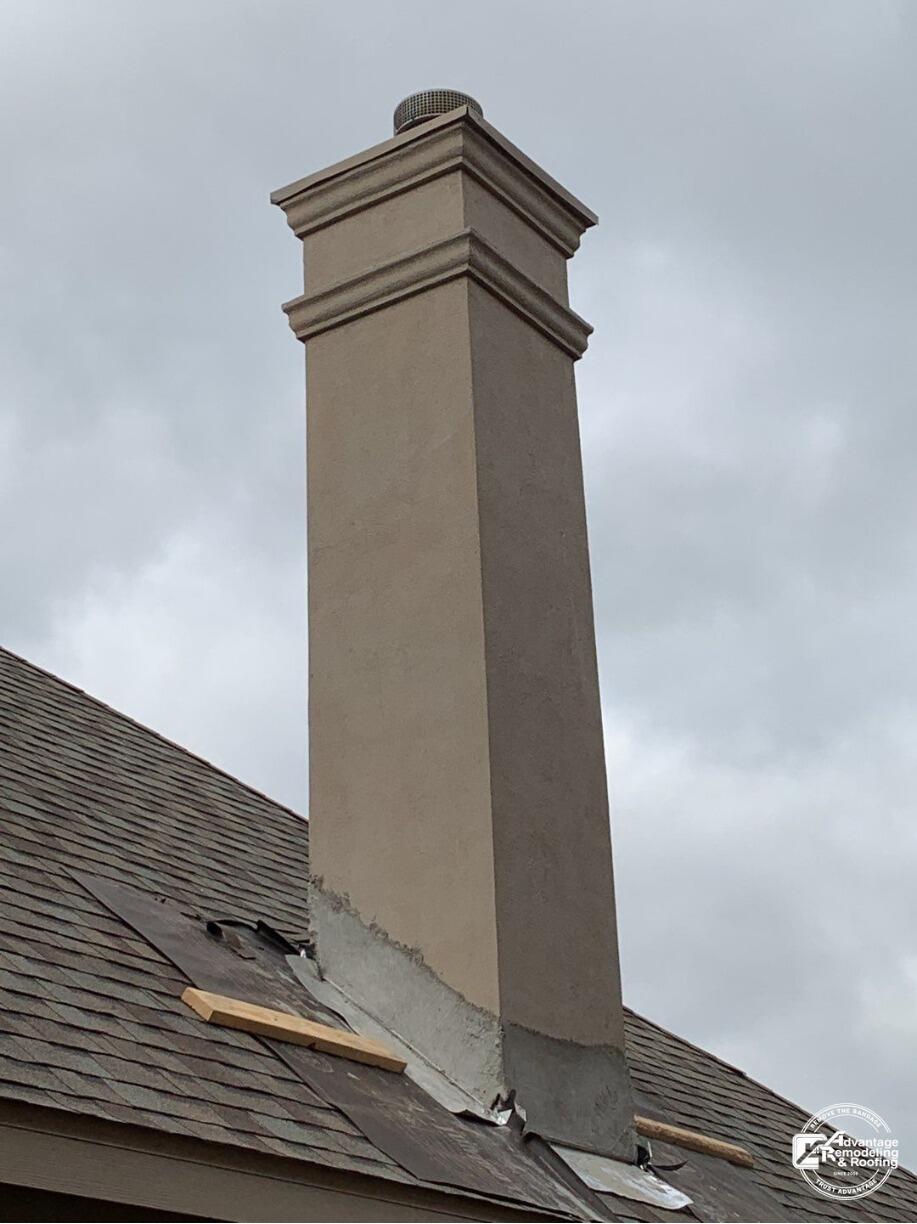
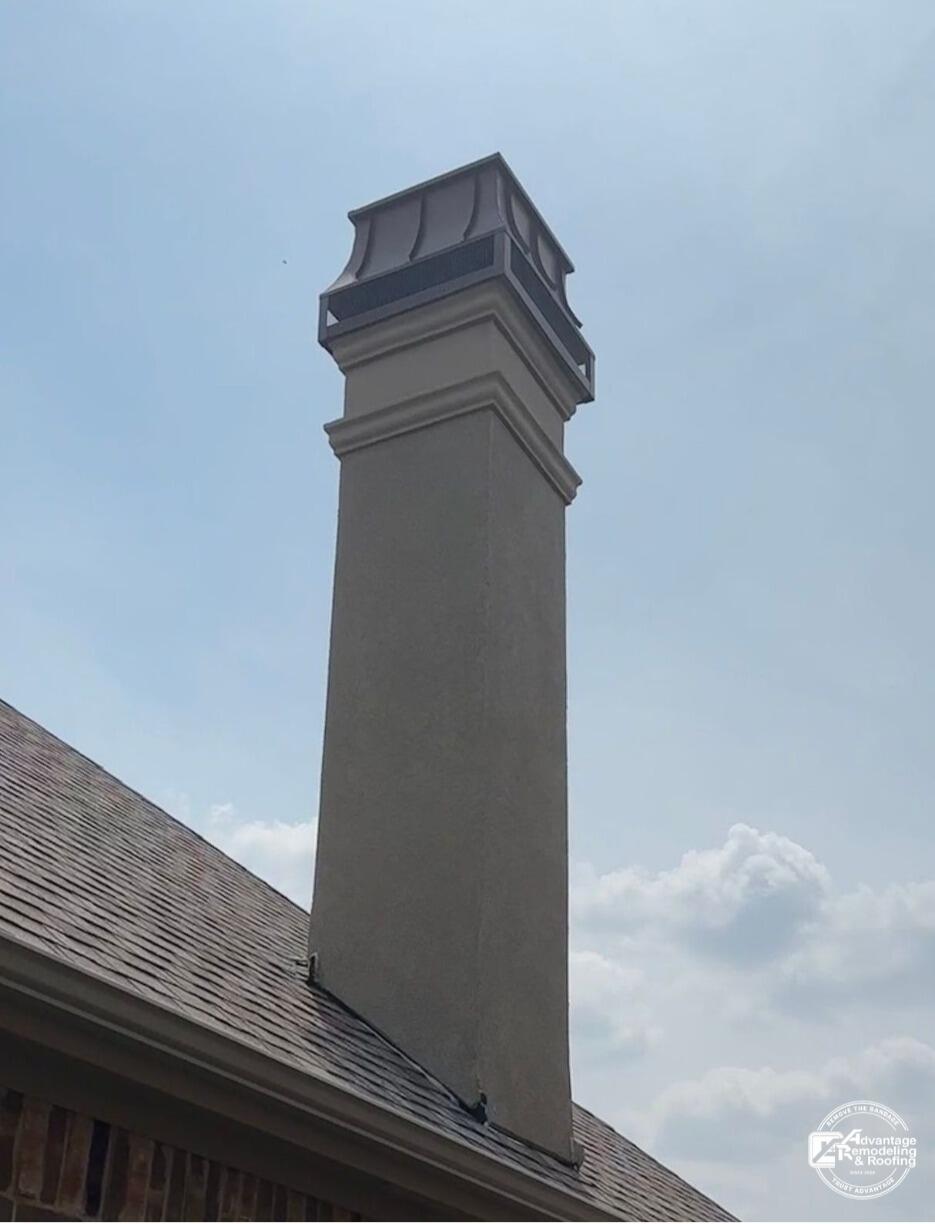
A tall chimney is the visual center of this Wylie metal roofing project, and that makes the Before and After pair notably different from a whole-house metal roof transformation. The surrounding roof field is visibly covered with shingles in both photographs. The metal-related work is concentrated around the chimney feature, where the images show a meaningful change in how the chimney meets the roof and how the top of the chimney is finished. Keeping attention on that limited, clearly visible area makes the project useful without overstating the scope beyond what the photographs support.
In the Before image, the light-colored stucco chimney rises through a gray-brown shingle slope beneath an overcast sky. Around the lower part of the chimney, the roof-to-chimney area looks unfinished: gray exposed material is visible, several loose sheet-like pieces sit near the shingles, and a narrow strip of wood can be seen at one edge. The picture has the character of work in progress rather than a completed exterior detail. At the top, the chimney has a smaller, less prominent covering. The photograph does not establish why the area was opened or what existed beneath it, so those questions remain outside the visible project story.
The After image presents the chimney as a much more composed architectural feature. The shingle field around it appears orderly, the lower transition no longer shows the loose pieces and exposed strip seen earlier, and a large dark metal-looking cap or cover now creates a strong finished shape at the top. That cap is the most obvious metal element in the final view. Its dark color contrasts with the light stucco and gives the upper chimney a defined silhouette against the sky. Because the main roof remains shingled, this is a good example of metal work functioning as a focused exterior component rather than automatically implying a metal roof across the entire home.
For Wylie homeowners, the project illustrates an important point about the phrase “metal roofing”: metal details can appear on smaller roof-related architectural areas, and the value of project photography is seeing exactly where those details are located. A chimney interrupts the roof plane and creates multiple visible edges, so close photos help a homeowner understand the relationship between the vertical masonry or stucco feature and the roofing around it. From the outside, it is reasonable to compare neatness, visible continuity, and the way the finished elements sit against the existing roof. It is not reasonable to use one photo to claim a hidden specification, particular metal subtype, or performance result.
The two views also show why scale matters when evaluating exterior work. The chimney is tall enough to dominate the composition, but the repair or metal-detail area occupies only a small fraction of the roof. A contractor’s project record should make that scale clear. Here, the Before image gives a close look at a temporarily unfinished lower intersection, while the After image shows the same chimney reading as a complete visual element with the shingle roof around it. The contrast is easy to follow even without technical labels for every piece.
This Wylie case study is therefore most helpful as an example of focused metal detailing at a roof feature. The photographs show a transition from loose and exposed-looking materials around the chimney to a cleaner finished presentation, along with a more substantial dark cap at the top. Homeowners comparing similar work can use that visual evidence to ask precise questions about what portion of the roof is included, which visible metal elements will change, and how the finished feature will relate to the existing shingles and exterior. The project demonstrates that a useful Before and After story does not have to involve replacing every roof plane; sometimes the clearest transformation is concentrated at one prominent architectural intersection.
Roof Replacement in Wylie, TX
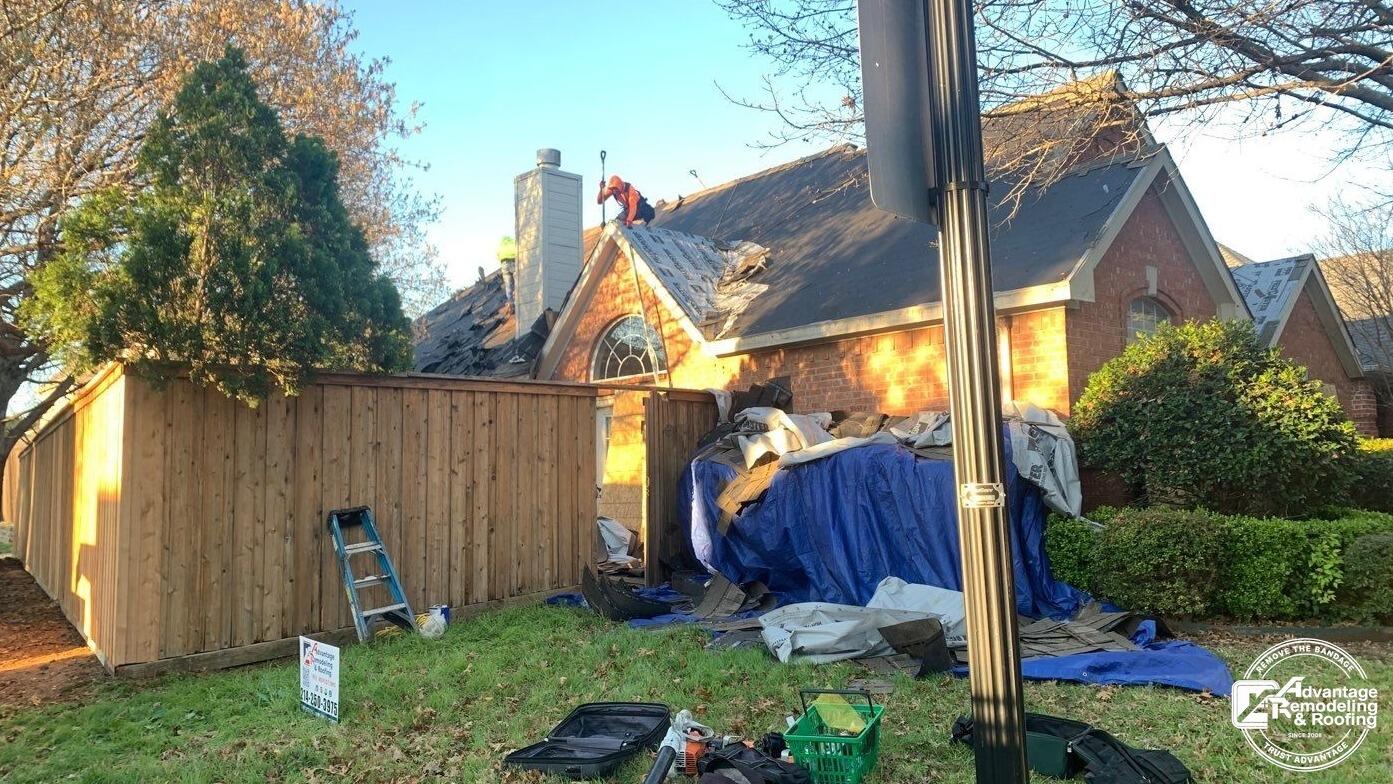
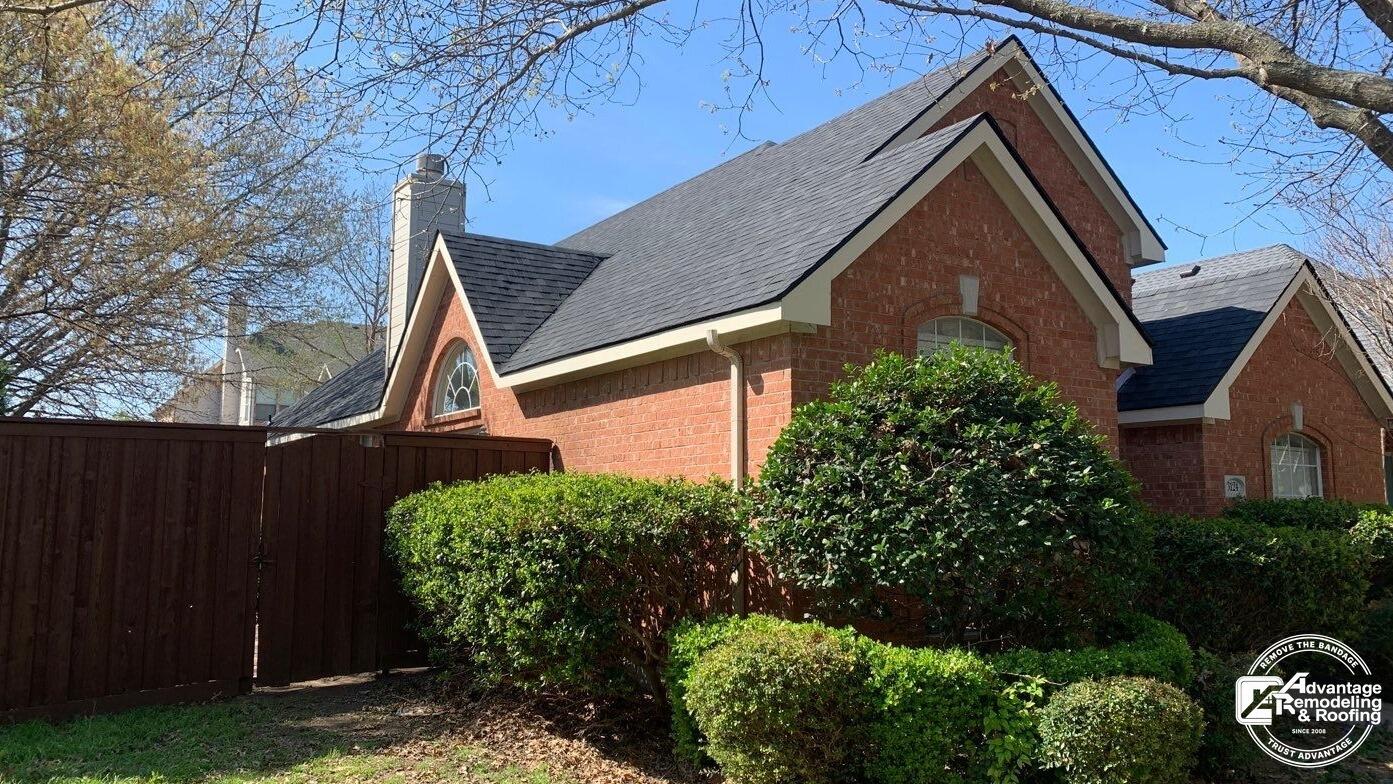
A side-yard viewpoint gives this Wylie roof replacement a very different story from a typical straight-on front-elevation comparison. The brick home is framed by a tall wood fence, mature trees, large shrubs, and a prominent chimney. Because the photographs are taken from nearly the same part of the property, the fence line, landscaping, brick gables, and chimney provide reliable visual anchors while the condition of the roof changes dramatically between the two images.
The Before photograph captures the roof during active work. Large portions of the visible roof have been stripped back, workers are positioned on the slopes, and material from the project is gathered below. Blue and light-colored protective coverings are visible near the house, with loose roofing debris occupying part of the yard. The scene makes the temporary disruption of a roof replacement visible in a way that a finished beauty shot cannot. It also shows how close the work zone can be to fences, bushes, trees, and other established parts of a residential property.
The After image is much quieter. The roof is covered by a dark, uniform finished surface that follows the main slope, the smaller gabled section, and the roof area around the chimney. The same brick walls and landscaping remain in view, which makes the finished roof easy to compare with the active-work stage. Instead of crew activity and exposed work areas drawing attention, the eye follows the clean roof planes and the sharp lines where the roof meets the white trim and brick exterior.
For homeowners in Wylie, the paired view is useful because it puts roof replacement in the context of an occupied, landscaped property. A roofing project is not performed in isolation from the rest of the exterior. Access, material handling, temporary protection, and the space around the house all become part of what a homeowner sees while the work is underway. The first photograph captures that reality directly. The second shows the property after the visible work zone has cleared and the roof again functions as part of the home's overall appearance.
The architecture also gives the comparison more detail than a simple old-roof/new-roof color change. The house includes a large main gable, a smaller projecting gable with an arched window, a chimney rising through the roof, and adjoining roof planes at different depths. A homeowner studying a finished replacement can look at how consistently the roofing surface carries across those separate areas and how the roof edges relate to fascia, trim, masonry, and the chimney. None of those visible details proves a particular product or installation specification, but together they help explain what to examine when reviewing completed exterior work.
The seasonal character of the photos adds another useful visual dimension. Bare branches and established evergreens frame the roofline, while the strong sunlight in the completed image makes the surface and edges easy to read. The finished roof appears orderly against a property that already has a lot of visual texture from brick, wood fencing, shrubs, and trees. That contrast helps the roof feel integrated rather than visually busy.
This Wylie Before and After set ultimately documents a transition from a clearly active replacement site to a composed residential exterior. The Before view makes the labor and temporary job conditions visible; the After view brings attention back to the home itself. For someone planning roof replacement in Wylie, the photographs offer a grounded way to think about the project: look beyond a single close-up of roofing material and consider the whole visible setting, including roof shape, chimney intersections, neighboring exterior features, landscaping, and the condition of the property once the work area is gone.
Siding Replacement in Wylie, TX
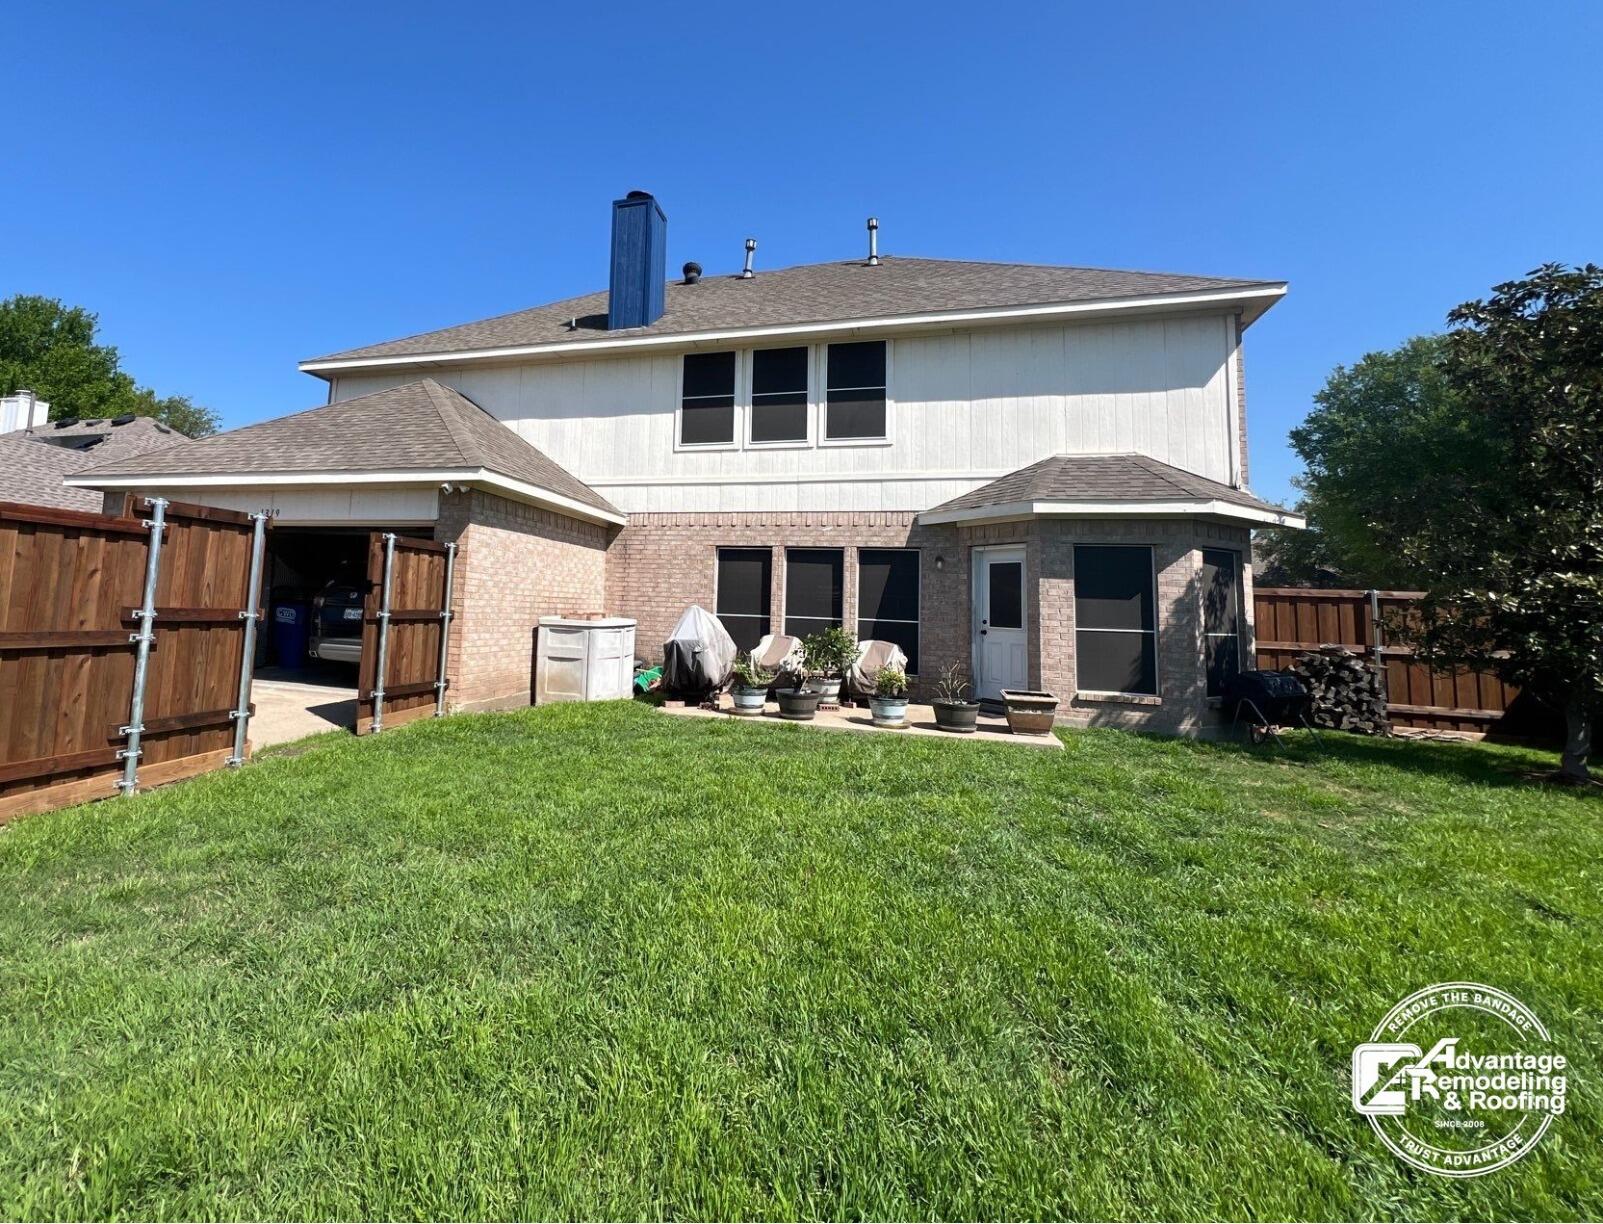
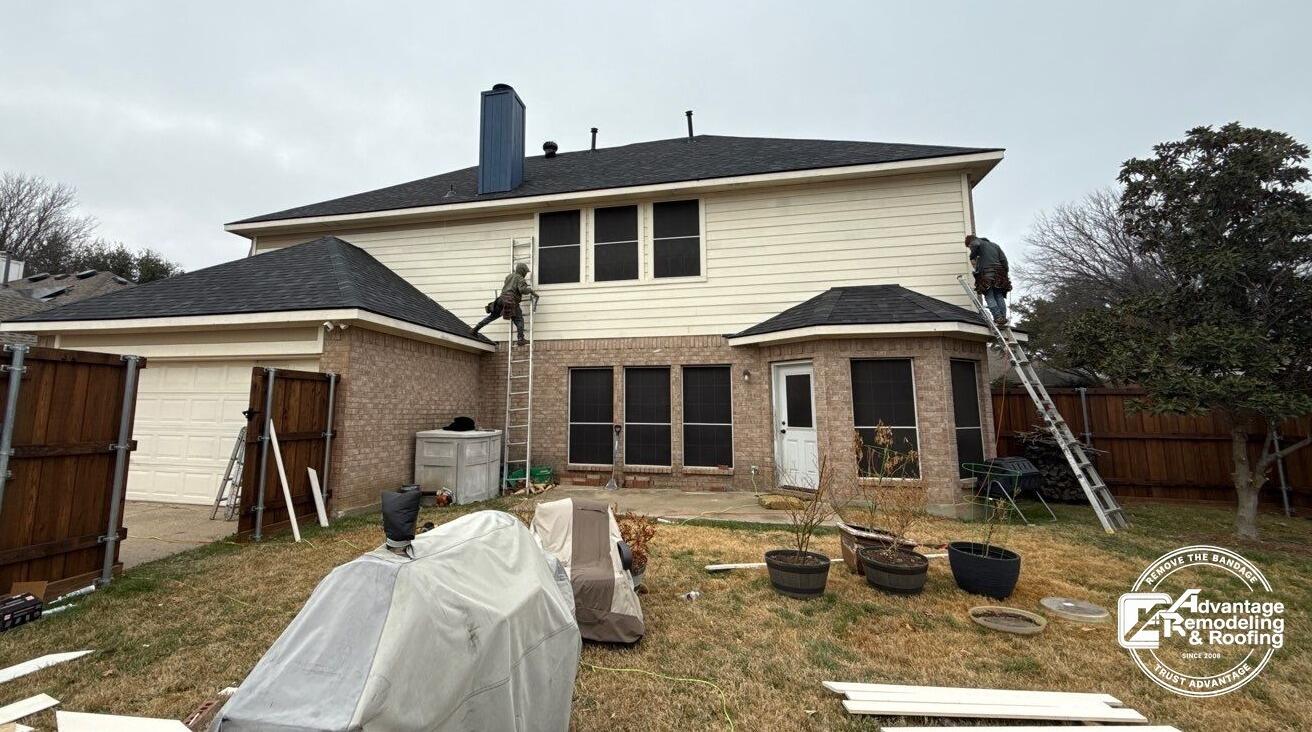
Two project photographs document a siding replacement in Wylie, TX, but they should be read as views of the same project rather than as a guaranteed chronological sequence. One image shows the rear elevation in bright sun with a green lawn and a clean-looking light-colored upper siding surface. The other shows workers on ladders, tools and materials in the yard, and active siding work on the rear exterior. Taken together, the photographs provide a useful look at both the work environment and the finished-looking appearance associated with this Wylie siding project.
The active-work photograph gives homeowners context that a finished exterior image cannot provide. Ladders reach the upper portion of the rear elevation, workers are positioned at the siding area, and materials are visible at ground level. That scene communicates the physical scale of exterior siding work on a multistory home. It also makes clear that replacement can involve access, staging, and coordinated movement around the property, particularly when upper wall sections are involved.
The brighter, cleaner rear-elevation view shifts attention from activity to appearance. Light-colored siding creates a consistent upper exterior surface above the lawn, and the wider framing makes it possible to judge the overall look rather than only a small construction detail. For homeowners considering siding replacement in Wylie, that broad perspective can be useful because the finished appearance of siding is experienced from across the yard or street, not only from a few feet away.
Exterior project documentation is often most informative when it includes both close work-stage images and wider views. A construction-stage photograph helps identify where crews were working and how much of the elevation was involved. A clear exterior view helps homeowners evaluate lines, visual continuity, and how the siding fits the proportions of the house. Both types of photographs add useful perspective: one shows the scale and activity of the work, while the other helps homeowners judge the overall look of the rear elevation. Together they make the project more concrete than a generic description of siding services.
This project also highlights the rear elevation, an area that is sometimes less represented in contractor portfolios than the front façade. Rear walls can contain their own combination of upper siding, windows, rooflines, patios, or yard access considerations.
Homeowners who are planning siding replacement may want to review all elevations that are part of the proposed work and ask how access will be handled around landscaping, fences, decks, or other features. That is general planning guidance, but the ladders and materials in the Wylie work-stage image make the access question especially easy to visualize.
A practical way to evaluate siding replacement photos is to study the visible project state, the work area, and the finished exterior presentation. Here, one photograph shows a Wylie rear elevation during active siding work, while another shows the same general exterior with a clean-looking light-colored siding surface. That makes the project useful as a local example for homeowners who want to understand how a multistory rear wall can look during the work and when construction activity is no longer dominating the view.
For homeowners comparing local siding projects, the strongest takeaway is the contrast in project state captured by the two photographs. One view is clearly centered on active exterior work, with workers, ladders, tools, and materials visible around the rear elevation. The other presents the same general exterior without the same visible construction activity and with a uniform-looking light-colored siding surface. The two views can be considered together without relying on which photograph came first. What remains certain is the project identity—siding replacement in Wylie, TX—and the visible contrast between a work-stage exterior and a clean, finished-looking rear elevation.
Protecting Your Home Before Roof Replacement
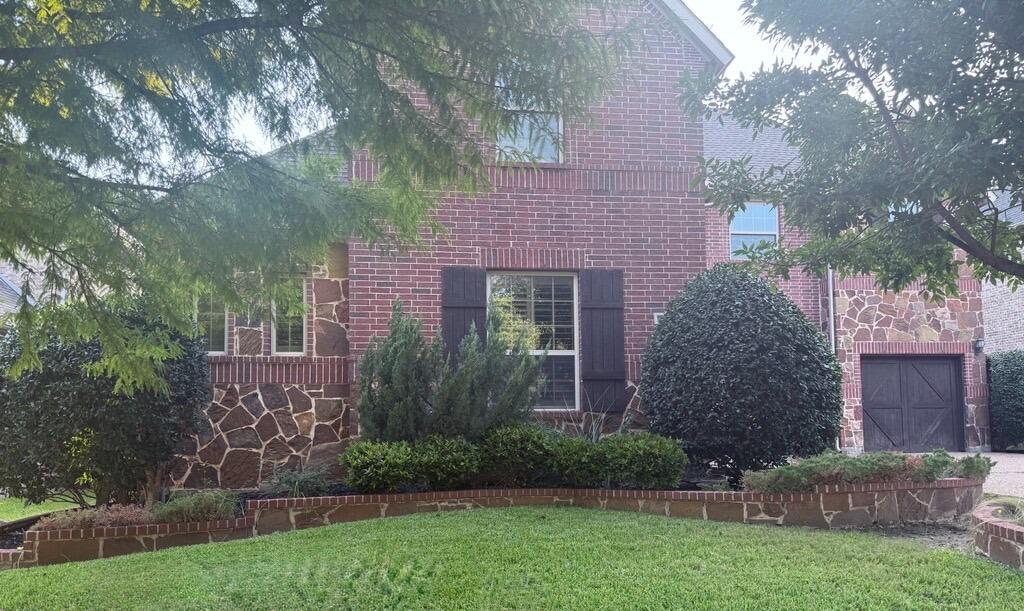
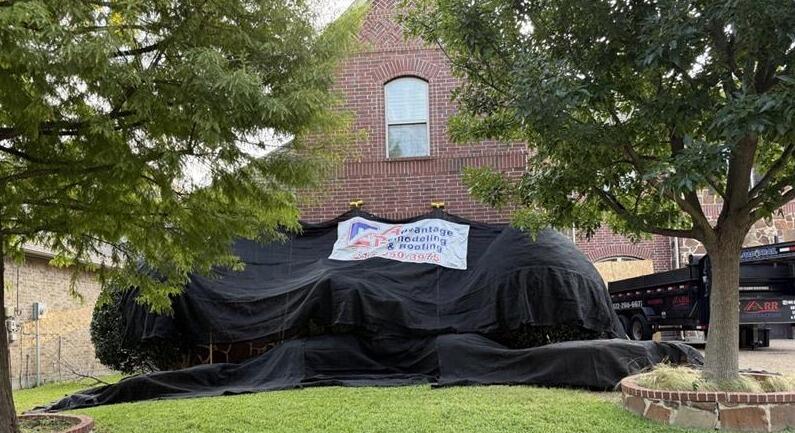
The second image in this McKinney roofing project does not show a finished roof at all. Instead, it captures one of the most important preparation steps before tear-off: black protective covering draped over shrubs and the front work zone. The first photo shows the windows and landscaping open to view. The next condition shows those same areas shielded before roofing debris begins moving from the roof to the ground. That makes this Before and After pair about property preparation rather than the appearance of new shingles.
The covering was installed to help protect windows, bushes, and landscaping while the old roof was removed. It was also intended to help control debris so loose material would be less likely to settle into difficult areas around the property. Those are practical concerns during roof replacement work, because tear-off temporarily turns the space around the house into an active construction zone even when the roofing work itself is taking place overhead.
Looking closely at the two stages, the landscaping provides the clearest point of comparison. Shrubs that are exposed in the first view are covered in the second, and the area below the windows is separated from the work zone by the draped material. The covering changes the appearance of the front of the house only temporarily, but that temporary change is the subject of this project. It shows what preparation can look like immediately before the more visible roofing work begins. For homeowners, this stage can be useful to understand because it happens before the dramatic part of a reroof. Materials may arrive, access routes are established, and parts of the property that sit below roof edges can be shielded. Landscaping cannot simply be moved indoors, and windows remain where they are, so protection has to be arranged around fixed features. The McKinney photos make that planning visible without needing to show the entire roof-removal sequence.
Property protection has to fit the shape of the home and the layout of its yard. A front elevation with shrubs directly below the eaves presents different conditions from an open side yard or a driveway with little planting. The covering in this project follows the actual front work area, including the vegetation and window zones that the crew intended to shield. That is more informative than treating preparation as a single identical setup for every house.
Homeowners reviewing roofing and remodeling work in McKinney can use this project as a reminder to look at what happens around the house as well as what happens on the roof. During tear-off, the ground-level environment matters because removed material has to travel somewhere. A thoughtful setup can create a clearer separation between active roofing work and the parts of the property the homeowner wants protected.
The two photos also clarify why the title focuses on protecting the home before replacement. The After condition here is not the final architectural result; it is the prepared condition that comes after the unprotected yard and before the roofing system is removed. That makes the project unusual among Before and After examples. Its transformation is temporary by design, but the temporary setup supports the larger roof project that follows. By the end of this comparison, the most important visual change is the black covering itself. Windows, shrubs, and landscaping that began fully exposed are now screened from the immediate work zone, while the shape of the home remains unchanged behind them. For a homeowner preparing for roof tear-off, that simple contrast answers a practical question: what can the property look like when the crew has taken time to shield vulnerable areas before removal work starts?

