

Before & After Photos
Click on a photo to enlarge.
Interior Remodeling After Water Damage in McKinney, TX


The kitchen became one of the main recovery areas after a pipe burst during freezing weather at this McKinney home. Water affected the first floor, and the first photograph catches the kitchen while restoration is still active. Flooring has been removed, portions of the cabinetry are unfinished, and work surfaces are exposed. The room still has the recognizable footprint of a kitchen, but the finishes that normally make it feel complete have been interrupted by the work required after the water event.
That starting condition makes the completed view particularly strong. White shaker-style cabinetry now defines the room, a large veined island surface occupies the center, a light backsplash runs behind the counters, and plank flooring ties the space together below. Dark hardware introduces contrast against the pale cabinets. These are visible changes in the actual room, and together they turn a disrupted work area back into a finished kitchen that reads as one coordinated interior.
When water damage reaches a kitchen, recovery can involve more than replacing the surface that first looks wet. Cabinets, flooring, wall edges, and adjoining finishes sit close together, so opening one area can affect how the rest of the room has to be completed. The water loss at this house affected the first floor, with the kitchen serving as a major restoration area. Homeowners facing similar disruption can find broader context in water-damage restoration, while these photos stay centered on the McKinney kitchen itself.
The island is one of the easiest fixed features to use when comparing the two stages. During the work, the kitchen looks partially disassembled and unfinished around it. In the final state, the large veined surface becomes a focal point surrounded by white cabinetry and light finishes. The contrast helps show how a kitchen can move from recovery into remodeling without needing a completely different room shape. The improvement comes through the finished materials and how they work together within the existing space. For a homeowner, the end of water mitigation is not necessarily the end of the project. A room can be dry and still look unfinished if flooring is missing, cabinetry is incomplete, or transitions have not been restored. The After photo represents the later stage when the kitchen is once again visually whole. Floor planks continue through the room, cabinet faces align, hardware is installed, and the backsplash and counters provide finished surfaces where construction conditions were previously visible.
The local context is familiar to anyone exploring remodeling work in McKinney: a home can need restoration because of an unexpected event, then require careful finish decisions before everyday rooms feel complete again. This project is a good example because the cause and the visual result are both clear. The burst pipe explains the disruption; the finished kitchen shows what the recovery ultimately had to accomplish.
The color palette also changes how the room reads after completion. Pale cabinetry, light backsplash, and the veined island surface reflect more light than the open construction stage, while dark pulls and fixtures create small points of contrast. None of those visual details need to be treated as promises about function. They simply describe the completed design that replaced the unfinished condition visible after the first-floor water loss.
By the last photo, the kitchen is no longer defined by removed flooring or incomplete cabinetry. Instead, the eye moves from plank flooring to white cabinets, across the island surface, and up to the backsplash and hardware. That coherent sequence of finished materials gives the McKinney project its final character. A freezing-weather pipe failure disrupted the first floor, and the kitchen emerged from that restoration as a fully finished room again.
Roof Replacement in McKinney, TX
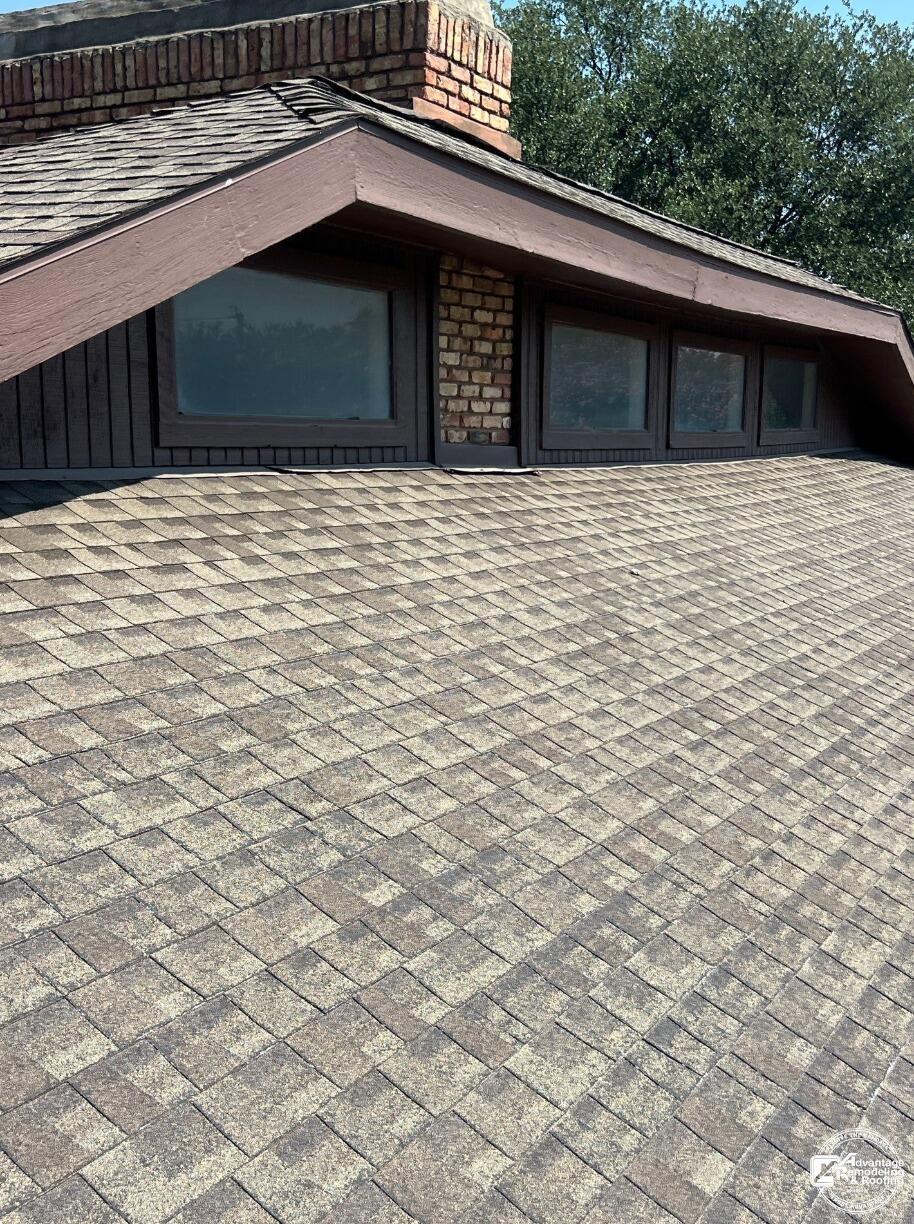
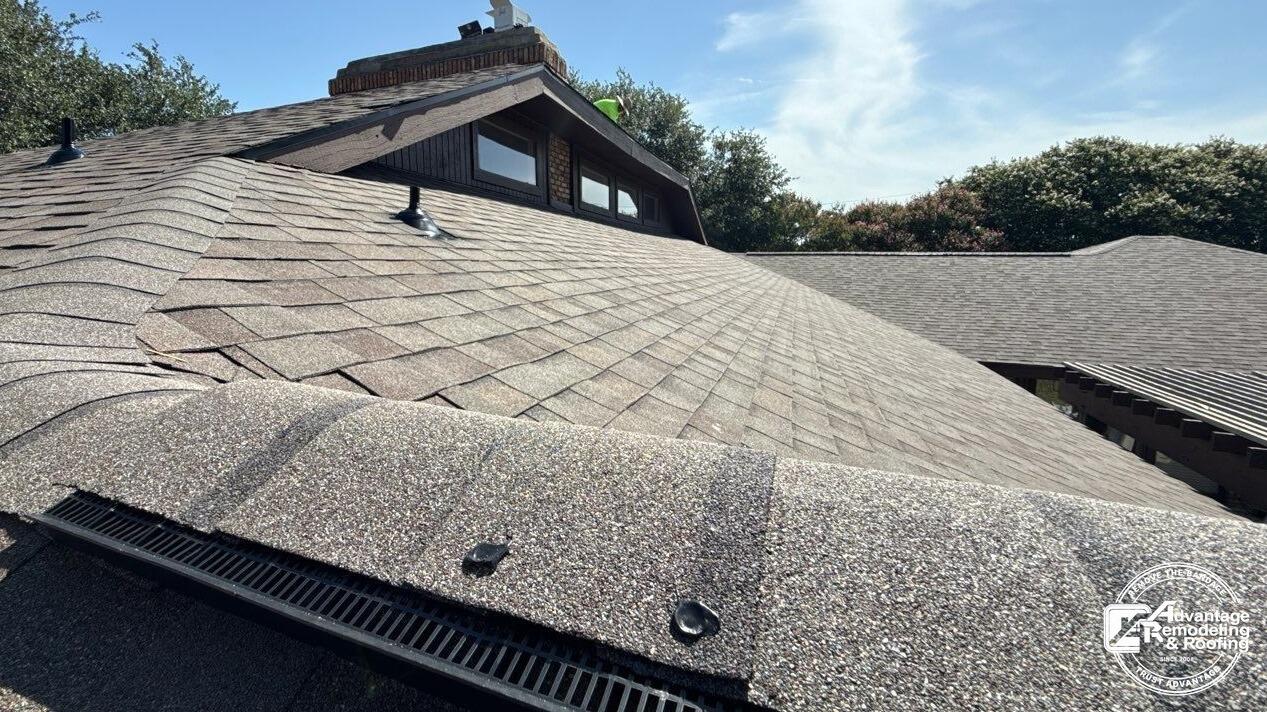
This McKinney roof replacement is documented with two photographs taken from different positions, so the most useful comparison comes from the architectural features that appear in both views rather than from a perfectly matched camera angle. A raised upper section with a row of dark-framed windows is the strongest visual reference. The roof planes wrap around that feature, creating a combination of broad sloped surfaces, shorter transitions, and several visible roof components.
The Before photograph is a close view looking toward that upper windowed structure. The existing roof surface fills most of the foreground and has a mottled, weathered appearance with visible variation across the individual courses. Dark trim outlines the raised section, and brickwork is visible behind and beside it. Because the camera is positioned close to the roofing surface, the image emphasizes texture, alignment, and the way the roof meets the vertical architectural element rather than showing the entire house.
The After photograph steps farther back and looks across a broader portion of the roof. The same upper windowed feature remains visible in the background, helping connect the two images to the same property. In this view, the finished roof presents a more uniform field across the large foreground slope and the adjoining sections. Several pipe-like roof penetrations are visible, and a long dark roof component runs along the lower edge of the photograph. These details give the completed view depth without requiring assumptions about their exact function or specification.
Using different viewpoints can actually make a Before and After set more informative when the photographs are read carefully. The closer first image allows a homeowner to study the existing surface near the raised architectural feature. The wider second image provides more context for how the roof spreads across the home. Together, the pair offers two scales of observation: one focused on surface condition and one focused on the continuity of the finished roof.
That distinction matters for homeowners considering roof replacement in McKinney. A roof is experienced both up close and as part of the larger exterior. From close range, consistency in the visible courses, edges, and transitions can attract attention. From farther away, the overall roof plane and its relationship to dormers, chimneys, vents, and adjoining structures become more important. A useful project photo set can help a homeowner ask better questions about both scales without pretending that a photograph proves what happened beneath the surface.
The windowed upper section is particularly helpful as a visual anchor because it creates several roof-to-wall transitions. The Before view shows the roof rising toward that feature at close range; the After view shows the feature sitting within a much broader completed roof composition. The building's distinctive geometry keeps the project from looking like a generic roofing example and makes it possible to follow the same house even though the camera positions changed.
The images also demonstrate why identical photo angles are not always necessary for a meaningful project record. A matched viewpoint is ideal for a direct visual transformation, but different views can document more of the property. Here, the first photograph concentrates on one roof area and the second reveals additional slopes and roof elements that were outside the original frame. The tradeoff is that the viewer should compare shared architectural cues rather than treating every visible feature as a one-to-one Before and After match.
No unsupported cause or product story is needed to make this project relevant. The live project is identified as a roof replacement in McKinney, and the photographs show the roof at two stages with the same recognizable upper structure present. The visible change is a roofing surface that reads more consistently in the completed view and a broader sense of how that surface extends around the home's architecture.
For McKinney homeowners reviewing similar work, this case study offers a practical way to evaluate project photography: look for recurring features that verify the property, study both close and wide views, and pay attention to how a finished roof carries across planes and around architectural interruptions. The value of the comparison is not a dramatic color shift alone. It is the ability to see the roof as both a detailed surface and a large exterior component of the home.
Exterior Door Replacement in Allen, TX


The problem with this Allen entry door was first noticed through everyday use. The existing wooden door was no longer shutting properly and had begun making unusual noises, turning a basic part of the home into a recurring concern. After an on-site examination, replacement was selected rather than continuing to live with the worn door. The Before photo shows the reddish-brown wood entry still in place within an arched brick surround, with decorative side glazing framing the opening.
Because the operating problem drove the project, the visual change came second. The homeowner was not simply swapping a door for a new color. A component that was no longer working properly needed to be addressed, and the replacement created an opportunity to give the entrance a different appearance at the same time. That combination of function and design is common in entry and interior remodeling, where a necessary replacement can also refresh a highly visible part of the house.
The brick opening remains the strongest constant between the photos. Its arched outline, masonry color, and side-glass arrangement stay recognizable, so the new door can be judged within the exact same architectural frame. In the After view, a dark glazed door system fills that opening with a large glass panel. The deeper color and larger glazed area give the front entry a more contemporary center without changing the surrounding brick facade. Front doors are unusual remodeling components because homeowners interact with them physically and visually every day. A door can look acceptable from the street and still be frustrating if it sticks, fails to close correctly, or makes unusual sounds. This Allen project began with those operating concerns. The finished image then documents the other side of the replacement: the entrance now has a noticeably different design from the solid reddish wood door shown before.
The glass panel is the most prominent element in the final appearance. It occupies much more of the door surface than the decorative glass in the earlier entry, while the dark frame creates a strong contrast against the lighter brick and trim. That visible difference makes the project easy to understand from photos alone. The operating problem explains why replacement happened; the glazed design explains why the finished entrance looks so different.
For homeowners planning a door replacement, the existing opening places practical boundaries around design choices. Brick, arches, sidelights, trim, and nearby walls may all remain in place, so a new door has to work within that fixed setting. The Allen photos demonstrate this clearly. The architecture surrounding the door is familiar from one image to the next, while the door itself changes enough to refresh the entry without rebuilding the facade.
Readers considering remodeling work in Allen can compare this focused project with larger interior or exterior renovations. Its scope is narrow, but the entrance is a visually important location. Replacing one worn component changes both the daily interaction with the home and the first impression created at the front door, even though the brick surround stays exactly where it was.
The side glazing deserves attention because it remains part of the composition after the main door changes. That continuity prevents the entrance from becoming visually disconnected from the original opening. The new dark door sits between familiar glass and masonry, so the update feels concentrated at the center rather than spread across the entire facade. This is a useful example of changing one major component while respecting the architectural frame around it.
By the final photo, the old reddish wooden door that would not shut properly has been removed from the opening. A dark glass-forward replacement now sits inside the same arched brick frame, giving the entrance a renewed visual identity. The project closes on that direct contrast: a worn door with an operating problem at the start, followed by a clearly different glazed entry after replacement.
Before & After Chimney Repair and Roof Flashing Restoration in Allen, TX
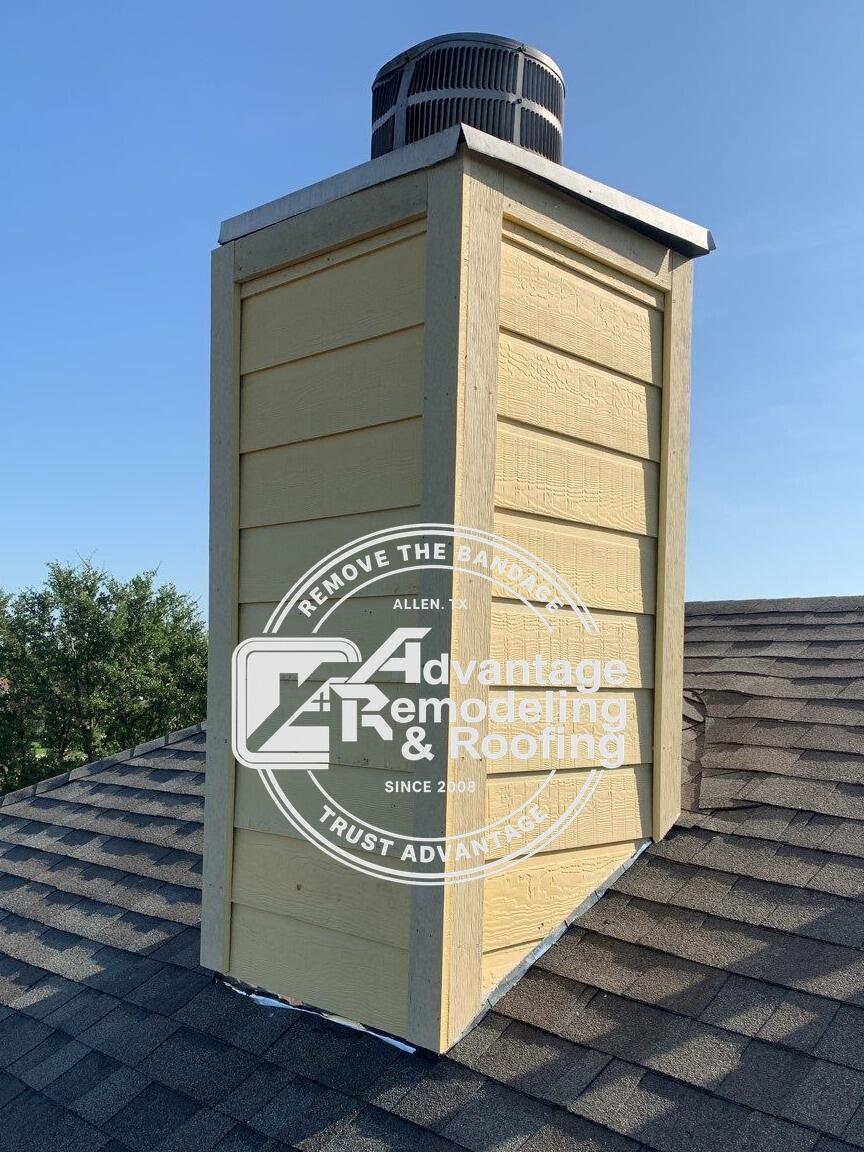
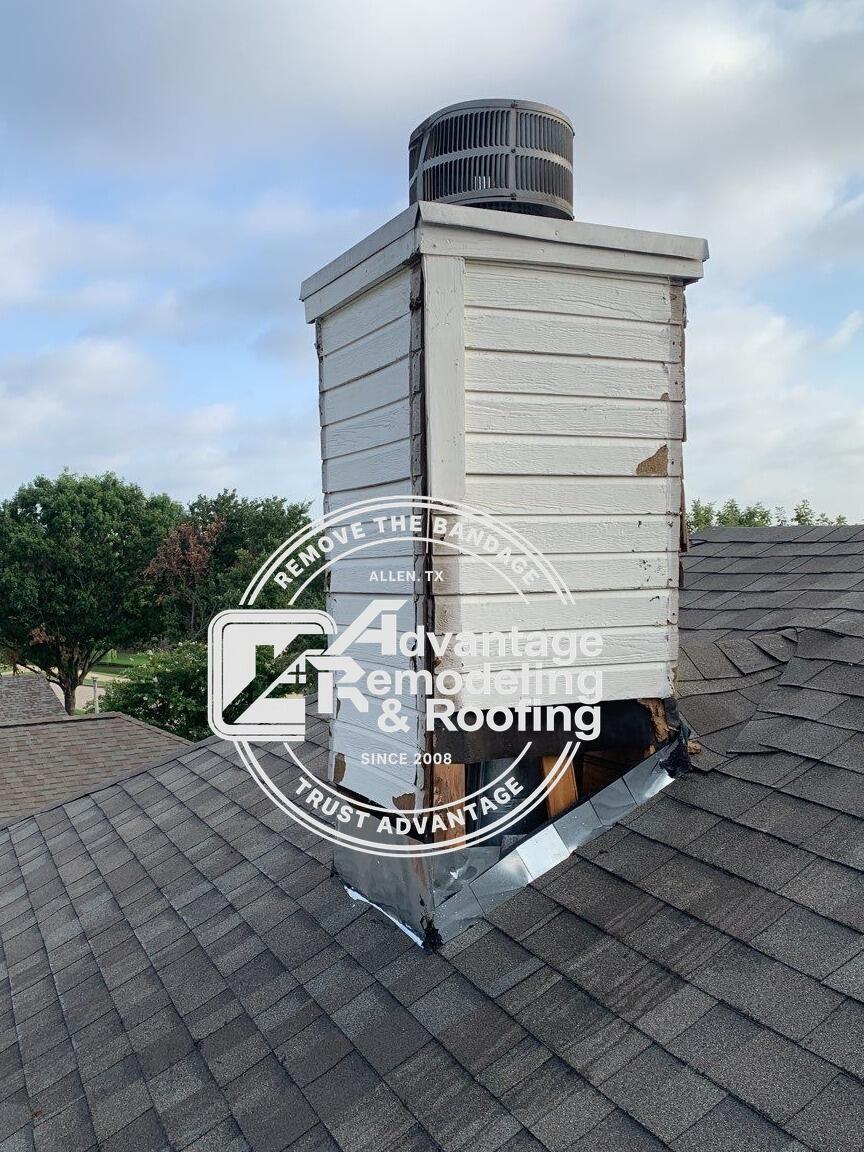
The roof-to-chimney transition was the center of this Allen repair project. A leaking chimney area and deteriorated roof flashing required restoration work concentrated on that interface instead of a whole-roof replacement. That narrow focus makes the Before and After sequence useful for homeowners who may notice water or exterior deterioration around a chimney while the rest of the roof remains a separate question.
The work included removal of damaged flashing, chimney waterproofing improvements, roof sealing, replacement of compromised materials, and reinforcement of vulnerable transition areas. In the Before image, the chimney-and-roof junction is shown before the restoration was complete. In the After image, the same area has a cleaner, finished appearance with the repaired transition integrated into the surrounding roof surface.
Chimneys create several intersecting exterior surfaces: the chimney body rises vertically while the roofing slopes around it, and flashing bridges that change in direction. On this Allen home, the repair was centered on that intersection and the materials immediately around it. The finished result therefore has to read as part of both the chimney exterior and the roof surface.
For homeowners, the project shows how a focused chimney-and-flashing repair can involve several connected steps even when the work is confined to a relatively small area. Damaged flashing was removed, waterproofing and sealing work were completed, compromised material was replaced, and the roof transition was restored to a finished condition. The After image brings those separate repair steps together in one visible roof-to-chimney assembly.
The repaired junction now reads as one continuous, finished detail around the chimney base.
Roof Replacement in Allen, TX. Euroshield Robben Roof Upgrade.


The roofing material is what separates this Allen replacement from a more conventional asphalt-shingle project. The homeowner selected Euroshield Robben roofing, identified for this job as a recycled-rubber product made from recycled tires. That choice followed an ongoing roof issue and turned the reroof into both a needed replacement and a distinctive material upgrade. The Before image catches the house during active work, when several roof planes are exposed and workers are positioned across the structure. Because the photo was taken in the middle of replacement, parts of the roof show decking or underlayment rather than a complete finished surface. Property-protection materials are also visible below. The house has multiple intersecting planes, including smaller roof sections around the rear elevation, so the work-stage image breaks the roofing system into many separate visual pieces. That temporary condition provides a strong contrast with the continuous dark surface in the After view.
Euroshield Robben was selected for this project, and the finished roof has a dark patterned appearance across the main planes and smaller bay-window sections. Homeowners researching roof replacement options can use this Allen example to see how an alternative roofing material looks once it is installed on a real multi-plane home. Its dark patterned surface becomes one of the most recognizable features of the completed rear roofline.
The roof geometry remains unchanged between the two stages. Ridges, valleys, rear walls, windows, and smaller roof sections all provide fixed reference points. What changes is the condition of the roofing surface. In the first image, construction materials and exposed areas interrupt the roof. In the second, the dark patterned finish carries over the same geometry, allowing separate planes to read as parts of one completed roof again. Material selection can influence the visual character of a reroof even when no architecture is altered. A homeowner may choose a product because of appearance, material composition, or other priorities discussed during planning. In this case, the recycled-rubber composition was specifically part of the project story. That makes the finished Allen roof a useful residential example of a reroof where the product category itself is a defining feature rather than an incidental detail.
The recycled-tire origin is also worth keeping in its proper place. Its recycled-tire composition was part of the homeowner's material choice and gives this Allen reroof a different material story from a conventional asphalt-only replacement. The visible project can stand on its own: an ongoing roof issue led to replacement, the homeowner selected Euroshield Robben, active multi-plane work followed, and the finished home received the dark roofing surface seen afterward.
Local homeowners considering roofing work in Allen may encounter many material choices. This project gives them one concrete point of comparison. The house retains the same shape and rooflines before and after, so the difference created by the roofing selection is not mixed with major structural changes. That makes the final material easier to evaluate visually against the existing exterior.
The smaller bay-window roof sections are particularly helpful in the final comparison. They repeat the same dark material used on the larger planes, showing that the selected roofing was carried across secondary architectural features as well as the main roof. That consistency lets the product choice read across the whole rear elevation instead of appearing as a change limited to one dominant slope.
The most memorable contrast is between the fragmented construction stage and the unified final roof. Exposed sections, workers, and temporary protection define the beginning; a continuous dark Euroshield Robben surface defines the end. Across the same Allen home, the replacement closes the ongoing roof issue with the specific recycled-rubber roofing material chosen for this project, creating a completed roof that is visually distinct from the work stage that preceded it.

