

Before & After Photos
Click on a photo to enlarge.
From Rotten to Renewed - Complete Fence and Gate Upgrade in Mckinney
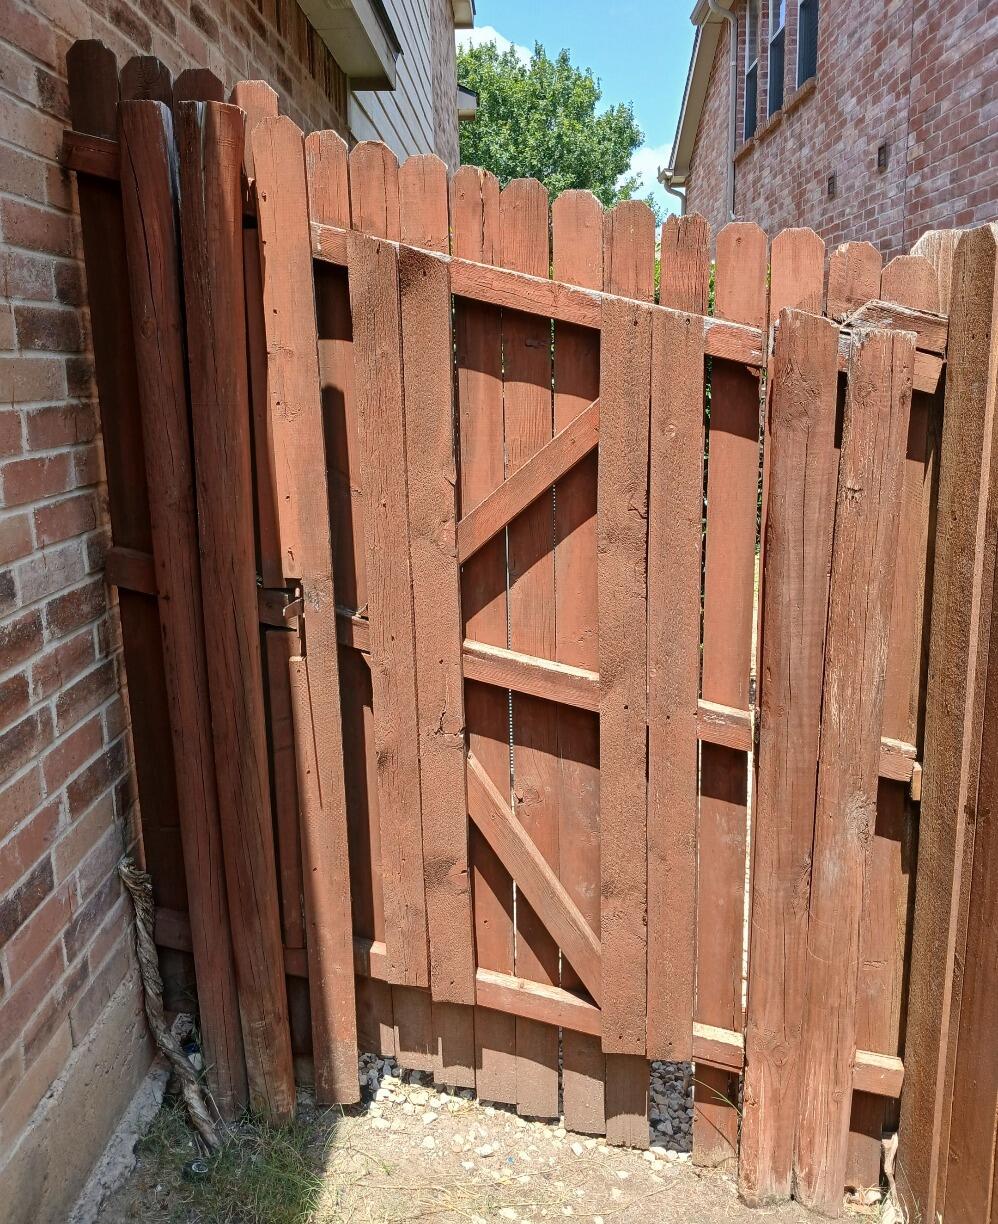
The side-yard gate at this McKinney property had moved far beyond ordinary weathering. In the Before photo, the reddish wood is split, misaligned, and visibly sagging, leaving the opening with an uneven and deteriorated appearance.
The project details connect that condition to ongoing exposure to moisture, corrosion, and pests, and describe the wood as rotten and unsafe. Rather than trying to straighten or patch a failing gate, the affected fence-and-gate section was removed and replaced.
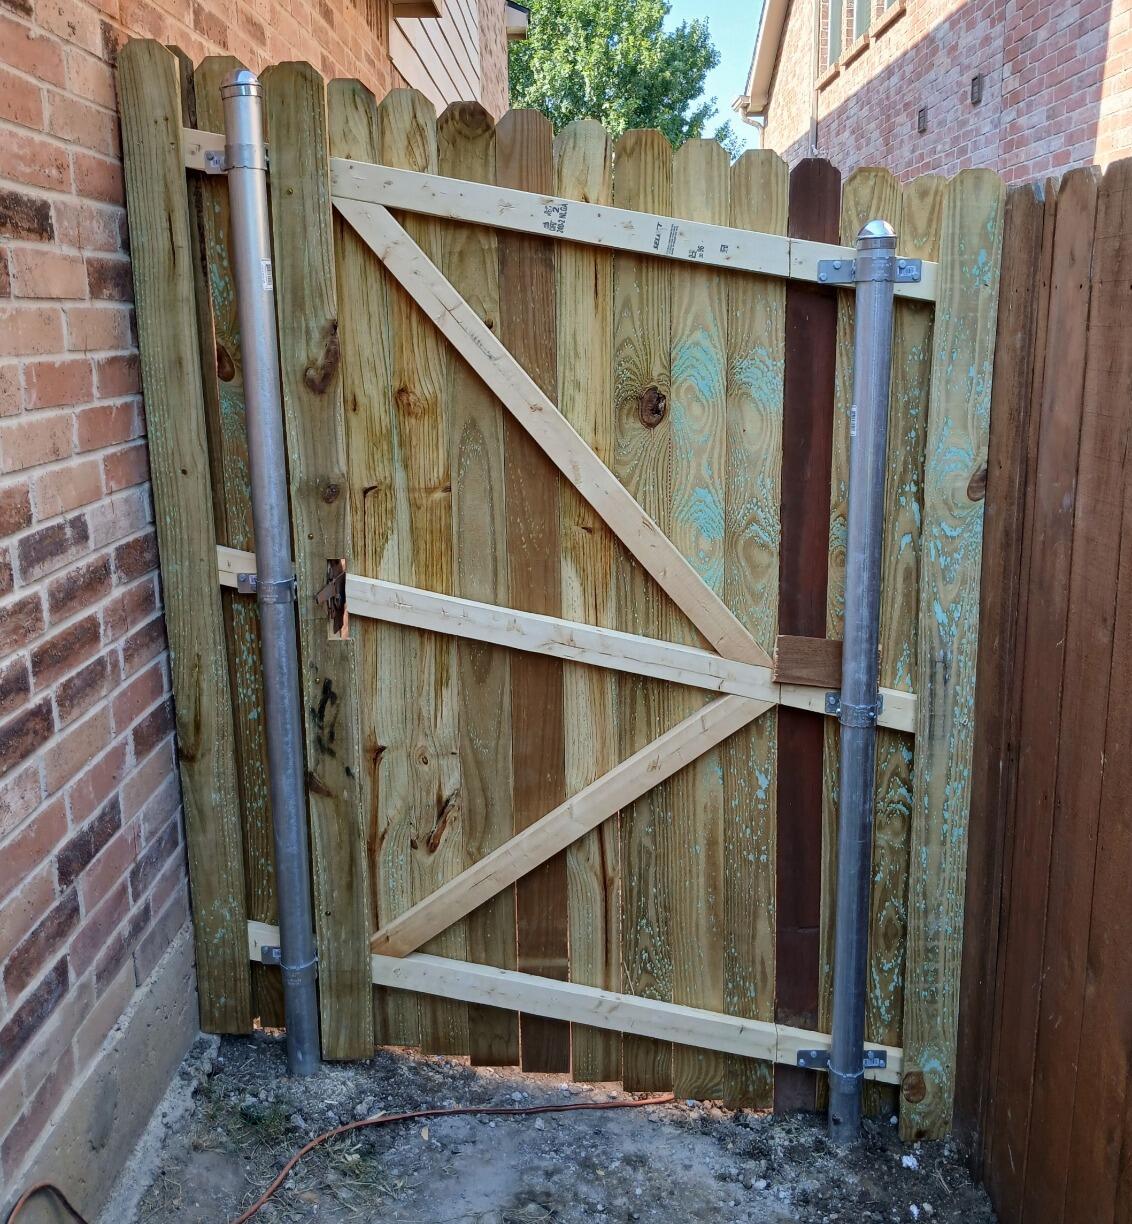
A gate has a different job from a stationary fence panel because it has to move while still forming part of the same boundary. When boards deteriorate and the assembly sags, both the opening and the surrounding fence line can become visually disorganized. This project addressed the gate together with the compromised section around it, which is why the After photo reads as a coordinated replacement rather than a new door hung inside an old, failing enclosure.
The completed assembly uses light wood, round steel posts, visible metal hinges, and diagonal bracing across the gate. Those details are easy to distinguish in the close view. The lighter material creates an immediate contrast with the dark, weathered wood that was removed, while the diagonal brace gives the new gate a strong visual structure. For homeowners considering exterior restoration and improvement work, the McKinney project shows how a small side-yard area can benefit from treating the gate and adjacent fence as one connected element.
The same property had also recently received a new Klaus Roofing Systems roof, but the fence photos keep this transformation centered on the ground-level enclosure. That distinction matters because a house can undergo several exterior improvements without every project needing to be blended into one story. Here, the fence and gate have their own condition, their own replacement scope, and their own visible result. The newer roof is part of the broader property context, not a substitute for the details of the fence work.
For a homeowner, the side yard is often a working space rather than a formal front elevation. It may be a route for lawn equipment, trash bins, pets, or access to the backyard. A deteriorated gate is therefore encountered repeatedly. Replacing it can change the daily experience of the property even though the project occupies only a narrow strip beside the house. The After photo emphasizes that practical scale: one opening, one new gate, and a renewed section of fence aligned across it.
The steel posts are another visible reference point. In the finished view they create clear vertical anchors, while the wood boards and rails define the fence line between them. That combination produces a more orderly boundary than the split and sagging wood seen before. Readers looking at McKinney exterior remodeling projects can compare this kind of focused replacement with larger whole-yard or whole-house work and see how much difference a narrow access point can make.
Nothing in the comparison requires an exaggerated transformation story. The damaged gate is plainly visible at the start, and the new assembly is plainly visible at the finish. The deterioration from moisture, corrosion, and pests explains why replacement was chosen. The After photo then documents the specific physical answer: light wood, diagonal bracing, metal hinges, and round steel posts arranged into a straight, usable-looking side-yard boundary.
More Before & After home projects cover roofs, interiors, and other exterior features, but this McKinney job stays tightly focused on a gate that had become rotten and unsafe. The final view closes that problem with a new fence-and-gate section that is aligned, visually consistent, and clearly separated from the deteriorated condition shown at the beginning.
Complete Kitchen Remodel in Carrollton, Texas: From Outdated to Outstanding


This Carrollton kitchen began at the opposite end of a cosmetic refresh. The first image shows a room in heavy demolition, with wall and finish materials removed and debris visible through the kitchen and adjoining area.
The project scope confirms that the old kitchen was taken down to walls and flooring, giving the remodel a broad starting point rather than preserving most of the existing finishes. From that stripped condition, the room was rebuilt around the homeowner's preferences for lighting, color, and finish selections.
The completed kitchen has a very different visual center. White cabinetry organizes the main working area, a geometric backsplash adds a distinct pattern behind the counters, and a stainless range becomes part of the finished appliance layout. New lighting is visible above the open space, while the floor transitions through a combination of wood and marble-look tile. The After photo is not just a brighter version of the old room; it reflects a complete reworking of the finishes and the way the kitchen connects with the adjoining living area.
Full demolition gives a remodel unusual flexibility, but it also means many decisions have to come back together in one room. Cabinet lines, appliance locations, floor materials, backsplash pattern, and lighting all occupy the same field of view. The Carrollton work included a modern kitchen set and appliances, a custom geometric backsplash, accent lighting with designer chandeliers, and flooring chosen as a combination rather than one repeated material. Those elements create several layers of detail without losing the room's overall cohesion.
The project also included electrical, ventilation, and structural upgrades. Those parts of home remodeling and restoration are not as visually dominant as white cabinets or a backsplash, yet they belong to the overall scope of the transformation. A kitchen remodel can bring visible design choices and behind-the-finish work into the same project, especially when demolition opens the room far enough for multiple systems to be addressed.
One of the strongest features in the After image is the relationship between surfaces. The pale cabinetry provides a calm background, the geometric backsplash introduces movement, and the large counters create broad horizontal work areas.
Darker hardware and the stainless range add contrast. Because the adjoining space is open to view, the lighting and flooring also have to work beyond the immediate cabinet run, helping the kitchen feel connected to the larger interior rather than visually boxed into one corner.
For homeowners planning a major kitchen change, this Carrollton project shows why selecting finishes one at a time is only part of the task. A backsplash can look very different once it sits beside cabinets, counters, flooring, and appliances. Lighting can change how those materials read across the day. When the room has been opened through full demolition, the final design has to re-establish a sense of order across all those choices at once.
The combination of wood and marble-look tile is a distinctive detail that separates this remodel from a single-material floor plan. Instead of making every surface identical, the finished interior uses contrast to define areas while still sharing the same open room. The design remains anchored by the white cabinetry and bright work surfaces, so the multiple finishes do not compete with the kitchen's overall direction.
Homeowners exploring interior remodeling options can compare this kind of full transformation with projects that preserve more of an existing room. Here, the visual story begins with demolition down to walls and flooring and ends with cabinetry, appliances, geometric backsplash, mixed flooring, new lighting, and a finished open kitchen. The distance between those two conditions is what makes this Carrollton remodel so distinctive.
Water damage from roof leak - floor and baseboard replacement
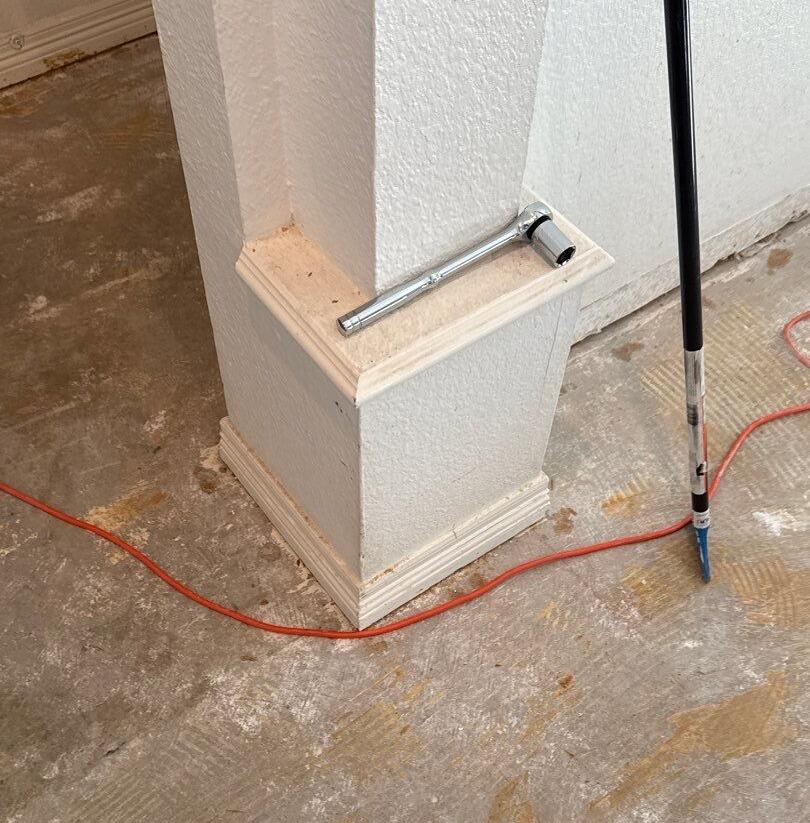
The first photo from this Plano interior makes the disruption immediately visible: finished flooring has been removed, exposed concrete surrounds a column, and portions of the trim are missing. The room is not being changed simply for appearance. A roof leak allowed moisture to travel through the walls and reach the flooring, so the interior work followed a water-intrusion problem that began above the living space. By the time the floor was opened, the project had moved from a roof leak into an interior restoration.
Flooring and baseboards were central parts of the repair. Those two finishes meet along the entire perimeter of a room, which means they have to be considered together when both are affected. Removing the floor exposes edges that are normally hidden, while removing baseboard changes the transition between wall and floor. The Before image captures that stripped-down stage around the column especially well, because the exposed concrete and incomplete trim make the room's construction condition easy to read.
Water problems can cross building surfaces quickly, so homeowners often need to think beyond the first visible drip. In this Plano project, moisture had already spread through the walls and reached the floor. The work therefore included the interior finishes that were affected rather than stopping at the roof. For readers dealing with similar property damage, water-damage restoration services provide useful context for the kind of multi-surface work that can follow an exterior leak.
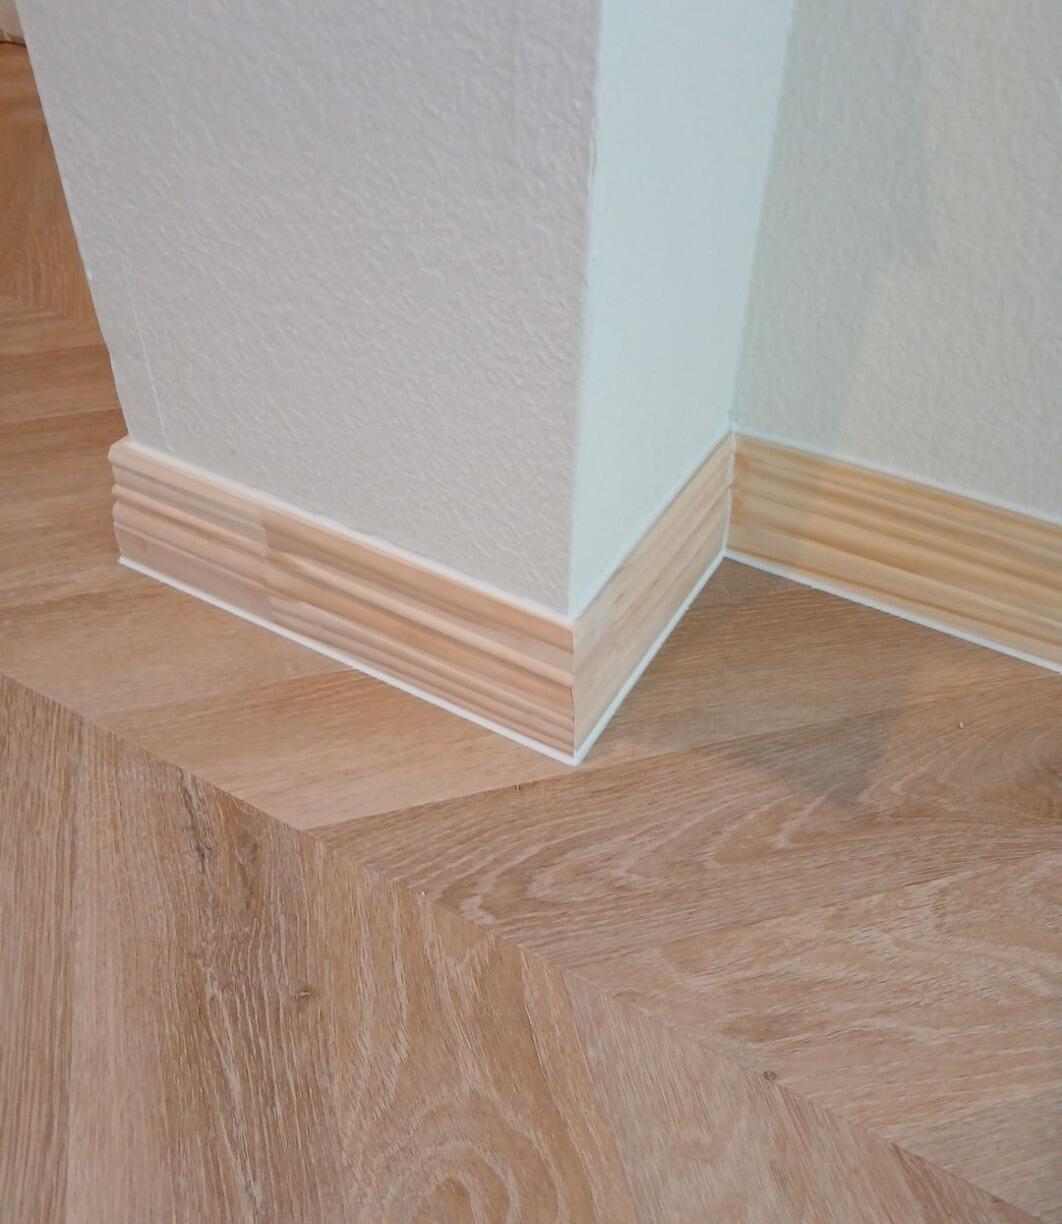
The After photo shows the same area returned to a finished condition. Light wood-look planks now run across the floor, the baseboard is back in place, and the column is neatly trimmed where it meets the new surface. The change is not limited to flooring color. The room regains the complete junctions between floor, wall, baseboard, and column that were missing during demolition. Those smaller perimeter details are what make a restored floor look integrated with the rest of the room instead of newly dropped into an unfinished shell. For a homeowner, a project like this is easier to understand when the exterior cause and interior consequences are kept connected. The roof leak explains why moisture entered. The spread through walls explains why the problem was not confined to a single spot directly under the roof. The exposed concrete in the first image shows how far the interior had to be opened, while the finished plank flooring and trim show what had to be rebuilt before the room could look complete again.
The project also highlights the importance of transitions in a finished interior. A large floor surface gets most of the attention, but baseboards frame that surface and help define every wall edge. Around a column, the trim has to turn corners cleanly and meet the flooring without leaving the area looking temporary. The After image is effective because those transitions are visible and orderly, allowing the eye to move across the room without the demolition-stage interruptions seen in the first photo.
Plano homeowners can find related local information through roofing and remodeling services in Plano, but this project has a particularly clear interior focus. The work followed a roof leak, yet the visible transformation happens at floor level. That connection is a useful reminder that restoring a home after water intrusion may involve separate trades and surfaces even when the original entry point was relatively far from the final repair area.
By completion, the exposed slab, removed trim, and work-stage appearance have been replaced by a continuous light plank floor and finished baseboards. The column once again looks integrated into the room, and the floor reads as a complete surface rather than an area under repair. From roof leak to interior restoration, the Plano project closes with a simple visual result: the damaged floor and trim are gone, and the living area has been returned to a finished, usable appearance.
Full Siding Replacement with Klaus Roofing Underlayment in Allen TX
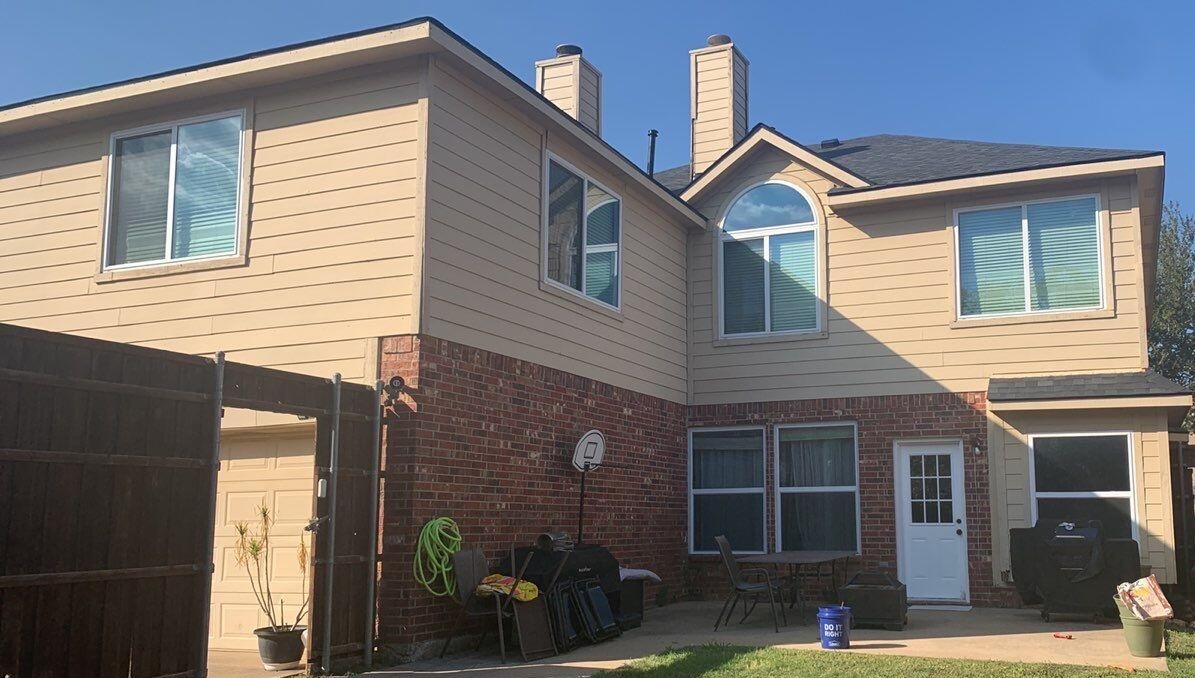
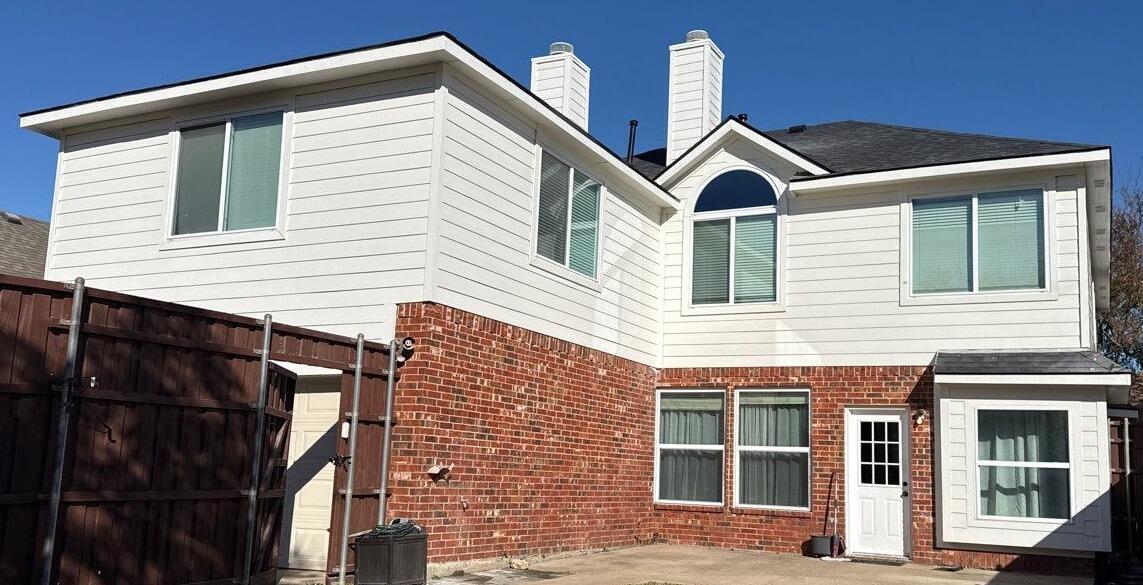
The rear elevation of this Allen home makes a full siding replacement easy to follow because the architecture stays constant while the upper exterior changes. In the first photo, tan horizontal siding covers the second-story wall above red brick.
The project called for removal of the old damaged siding rather than a small isolated repair, so the work opened a much larger portion of the exterior. That broader scope created an opportunity to prepare the exposed surface before the new finish went back on.
Preparation was part of this job. After the existing siding was removed, the exposed wall surface was prepared and Klaus Roofing underlayment was installed before the new siding. That sequence matters when looking at a completed exterior because the After photo naturally emphasizes the visible finish, while the underlayment belongs to the work hidden beneath it. Homeowners exploring full siding replacement can use this project to see how a finished wall may represent several distinct stages of removal, preparation, and installation.
The brick lower story gives both photos a stable reference line. It was not replaced, so the eye can compare the upper wall without being distracted by a change to the whole rear elevation. In the Before condition, the tan siding creates a warmer, darker band above the masonry. The rooflines, windows, and overall proportions stay the same from one image to the next. That makes the final change in siding tone and consistency especially easy to see.
Once the new siding was installed, the upper wall took on a lighter and brighter appearance. The horizontal courses look more uniform across the visible rear elevation, and the contrast with the red brick below is stronger than it was before.
This is a visual change, not a claim that the architecture itself was altered. The house kept the same openings and massing; the transformation came from replacing the exterior layer and completing the wall over the underlayment.
For homeowners, a full replacement differs from spot work because the project has to be considered across an entire wall or larger elevation. Consistency becomes important at window edges, corners, roof transitions, and the line where siding meets brick. The Allen photos are useful in that respect because several of those conditions are visible at once. A broad finished field of siding has fewer places for mismatched old and new sections to compete visually, so the result reads as one renewed surface rather than a series of patches.
The local setting is also relevant for anyone comparing home improvement work in Allen. Many North Texas houses combine masonry on the lower level with siding above, making the upper wall an important part of the home's exterior character. When that upper material is replaced, color and horizontal alignment can change the appearance of a large portion of the house even though the permanent brick remains untouched.
There is another practical lesson in the project sequence: the most visually dramatic moment is not necessarily the most important construction stage. Removing damaged siding exposes the surface that will soon disappear again, and installing underlayment creates a layer that the homeowner may never see once the wall is closed. The final siding is what defines the After photo, while the preparation explains how the project moved from the old tan exterior to the new lighter finish.
Readers who want to compare other exterior transformations can also browse additional Before & After projects. On this Allen house, however, the key change is straightforward and specific: the old damaged siding was removed, the exposed surface was prepared, Klaus Roofing underlayment was installed, and the rear upper wall was finished with lighter horizontal siding. The brick, windows, and rooflines stayed recognizable while the exterior above them took on a renewed, more uniform appearance.
Emergency Roof Repair in Prosper TX


An active leak made timing the central issue at this Prosper home. The homeowner called in the morning, and the crew was on the roof by lunchtime.
That same-day response separates this service call from a planned reroof or a cosmetic maintenance visit. Water was already getting through, so the immediate job was to inspect the roof area and perform localized emergency work rather than schedule a broader project weeks later.
The Before photo is a close view of the asphalt-shingle roof. Several dark or missing-looking rectangular areas appear near roof penetrations and ridge features, and the project notes describe several potential leak locations after a storm. Those visible areas create a concentrated field of concern instead of one obvious hole. Homeowners dealing with an active leak can find relevant service context through roof repair, but this Prosper job stays focused on the specific localized conditions photographed that day.
The After image shows multiple rectangular silver-blue patches covering several spots on the same roof area. Their shape and color make the repair locations easy to identify.
That is important because the finished condition is not being presented as a full roof replacement. The roof around the patches remains in place, and the work visible in the photo is concentrated at individual areas where emergency repair was performed.
Emergency roofing often looks different from a planned replacement in Before and After photos. A full reroof can change every visible plane, while localized work may leave most of the existing shingles unchanged. The transformation is therefore smaller but still meaningful. Here, the visual difference is the addition of patch materials at several roof locations, matching the immediate goal of responding to active water entry.
For a homeowner, the first indoor sign of a leak does not always reveal the exact exterior entry point. Roof penetrations, transitions, and nearby surfaces may all need attention during an inspection. This project's notes mention several potential locations following the storm, which helps explain why multiple patches appear in the After image. At this home, several potential locations were identified, which is why the After photo contains more than one localized patch.
The same-day timeline is also easy to understand in practical terms. A morning call followed by roof access around lunchtime means the service was organized around an immediate problem already affecting the home. The morning-to-lunchtime sequence gives Prosper homeowners a concrete view of how quickly this crew responded once the active leak was reported.
Another useful feature of the photos is their close scale. Instead of stepping back to show the entire house, the camera stays near the repaired roof area. That makes individual patches visible and keeps the work from being mistaken for a more extensive replacement. The image pair therefore matches the scope well: several local areas before repair, followed by several local areas with patch material installed.
The silver-blue repair material is visually unmistakable against the existing shingles, which is useful for understanding scope. Rather than trying to make the emergency work disappear in the photograph, the After view makes each treated location easy to trace. A homeowner can see where the crew concentrated its immediate work and how those locations relate to nearby penetrations and ridge features on the same roof section.
More Before & After roof projects may show full tear-offs, new shingles, or other types of work. This Prosper project ends differently. The roof remains largely recognizable, while the emergency repair locations are clearly marked by the new patches. From active leak to same-day roof work, the project clearly ends with several visible localized patches across the affected roof area.

