

Before & After Photos
Click on a photo to enlarge.
Metal Roof Overhang Replacement in Richardson, TX


A small metal overhang above the bay-window area became its own roofing project within a larger Richardson roof replacement. The section is compact compared with the main roof, but inspection found dents in the metal after a hailstorm. Rather than leaving that architectural feature outside the broader work, the metal overhang was replaced along with the main roof. The Before and After photos isolate the smaller section so its change does not disappear inside a whole-house roofing view. In the first image, charcoal metal covers several short sloped facets above the windows. Light fascia and brick walls surround the overhang, making its shape easy to read. The metal is different from the primary roofing elsewhere on the house, which is one reason the project stands out. Homes can combine more than one roofing material, and secondary accents still have to be considered when damage affects the larger system.
Hail dents found during inspection explain why this section was included in the replacement. Homeowners comparing metal roofing work can see how a small architectural roof can be treated as a distinct material area even when it is part of a broader reroof. On this Richardson home, those dents brought the metal overhang into the same replacement scope as the main roof.
The After photo shows darker, cleaner metal panels across the same intersecting facets. Raised seam lines are visible, giving the finished overhang a more defined pattern than the earlier surface. The bay-window geometry, brick walls, and light trim remain unchanged, so the new metal becomes the primary visual difference. Because the camera stays close to the feature, the finished seams and panel layout can be seen more clearly than they would be in a distant exterior shot. Small roof sections can be easy to overlook during a major replacement because the main roof naturally receives most of the attention. Yet these accents still sit in the weather and contribute to the home's exterior appearance. On this project, the overhang is especially noticeable because it projects from the brick wall at eye level. Renewing the metal changed a detail that homeowners and visitors can see without looking up at the highest roof planes.
There is also a useful material contrast in the project. The larger reroof and the small metal section did not have to be described as one identical surface. Instead, each material could be addressed within its own location while still being part of one coordinated exterior job. Readers exploring roofing projects in Richardson can use this example to recognize mixed-material roofs as connected systems with distinct components.
The dark finished panels also interact differently with the light fascia and red brick than the older metal did. That contrast helps outline the shape of the bay-window roof and makes the raised seams more visible. The same small roof shape remains before and after, while the metal covering changes following the hail damage found during inspection.
The overhang’s multiple short slopes also make panel layout more noticeable than it would be on one broad rectangular roof. Each facet meets another at an angle, so the raised seam pattern has to follow a compact, intersecting shape. In the finished image, those seams help define the geometry rather than obscure it, giving the small bay-window roof a crisp visual structure against the surrounding brick.
Other Before & After roofing projects may emphasize large slopes or full-house views. This Richardson comparison deliberately stays close to a secondary feature. A hail-dented metal overhang that accompanied a larger roof replacement is shown before work and then with new dark raised-seam panels, giving one small but important part of the home's mixed roofing system a clear finished endpoint.
Roof Replacement in Richardson, TX
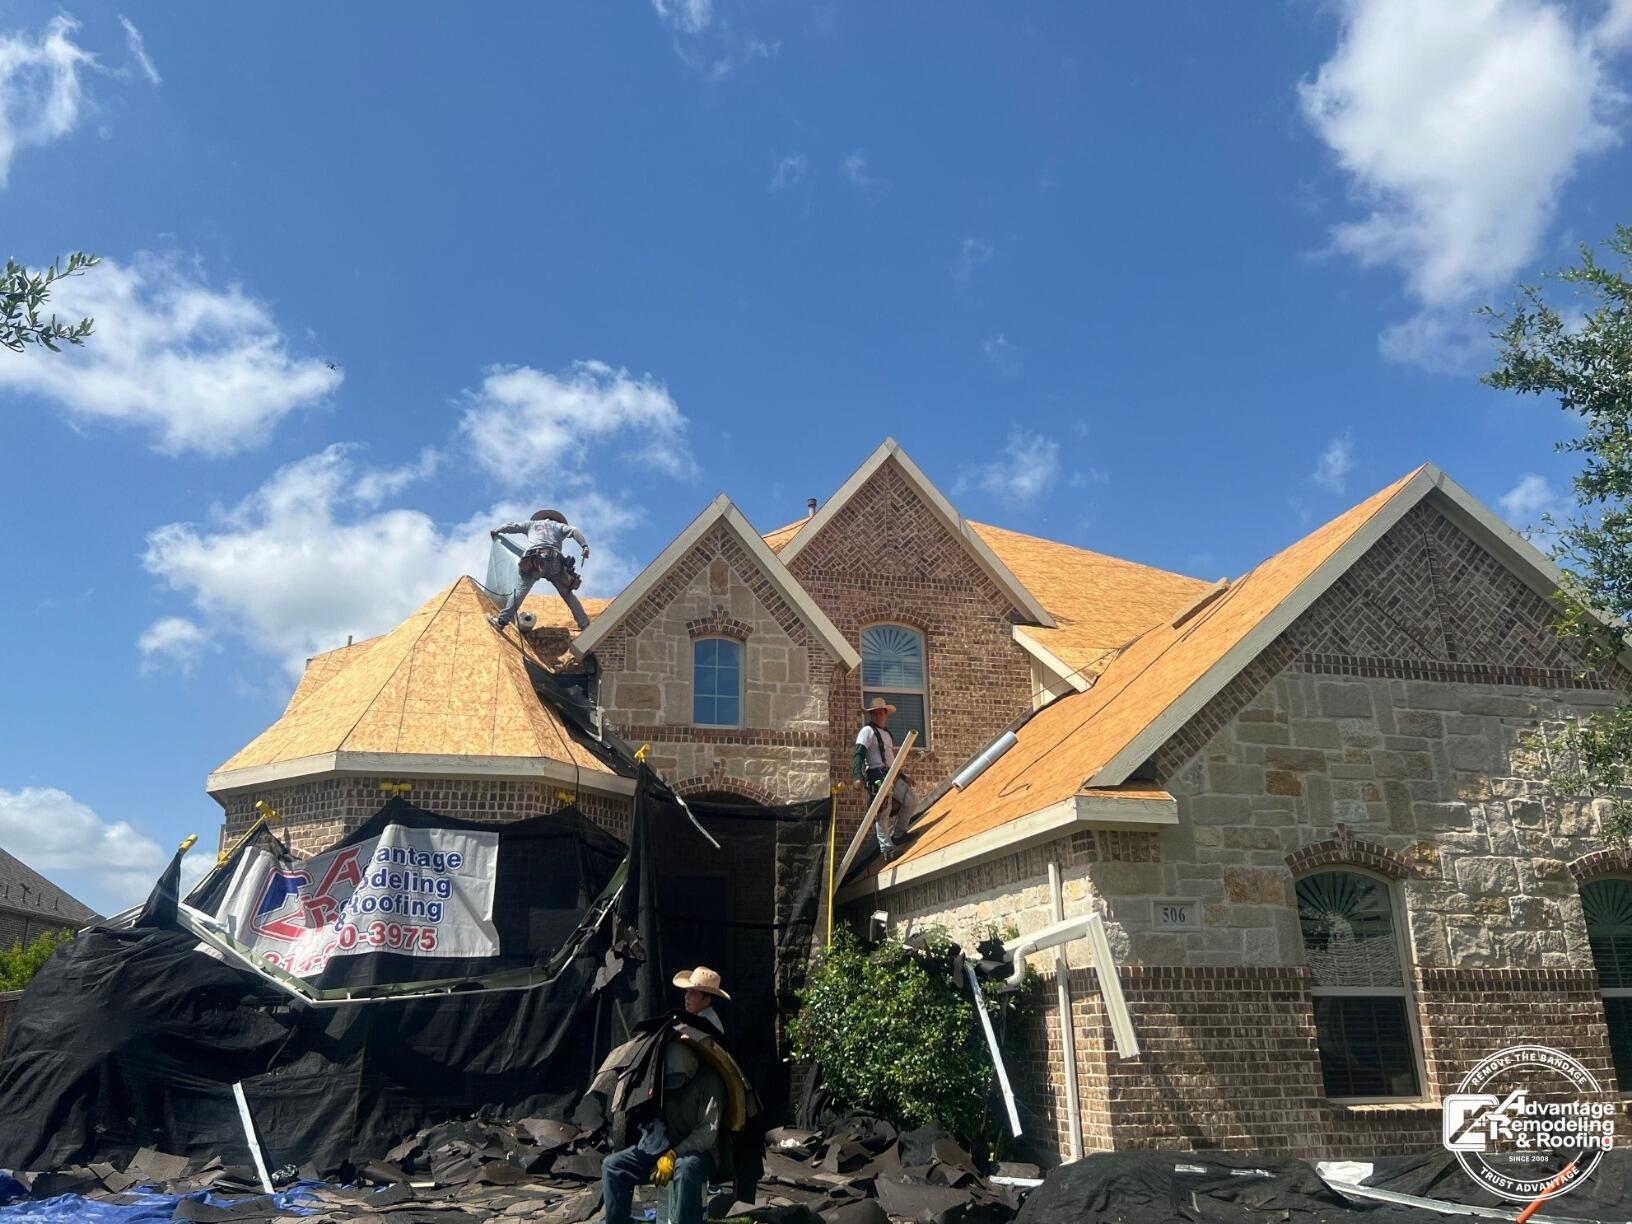
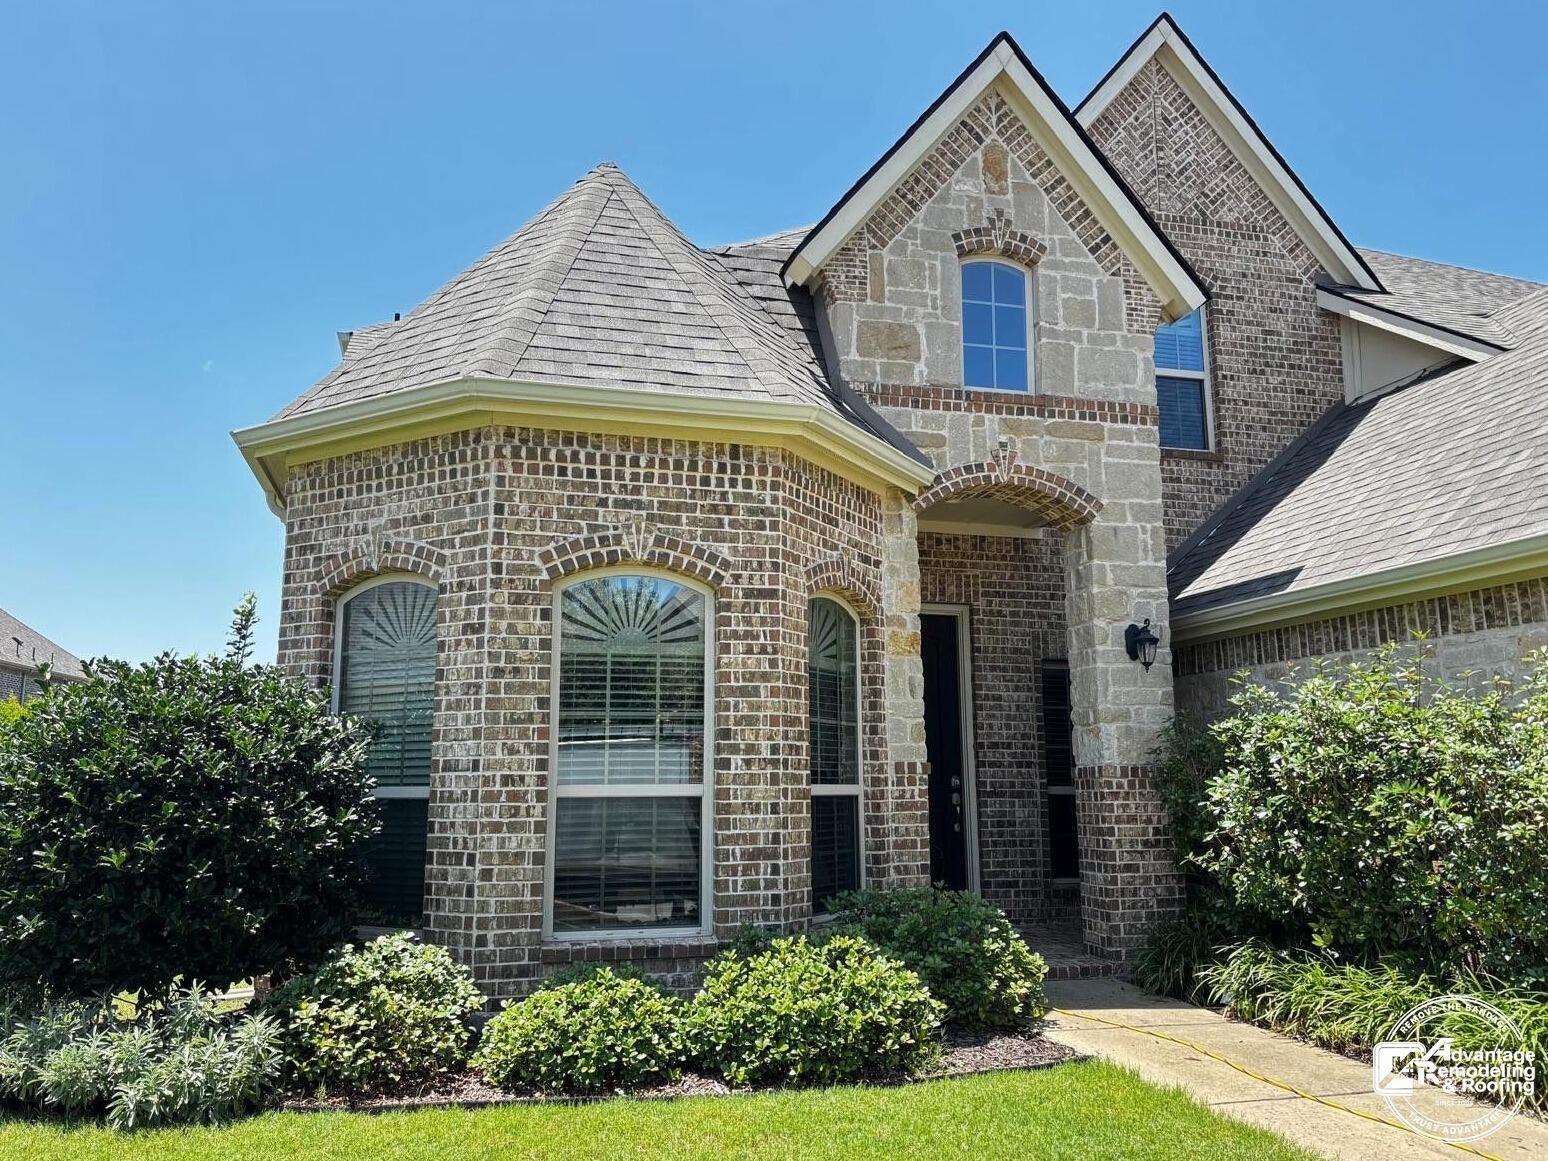
This Richardson roof replacement is easy to understand because the two project photographs show opposite ends of the work: an active replacement stage and the finished roof across the same highly detailed front elevation. The home has several intersecting roof sections, multiple front-facing gables, a rounded roof area over the left side of the façade, and changes in height around the central entry. Those architectural features make the roof a major visual part of the house rather than a single flat background above the brick and stone exterior.
In the Before image, much of the existing roof surface has already been removed. Large areas of exposed wood are visible across the roof planes, and crew members can be seen working at different points on the structure. Roofing debris is visible near the ground, while dark protective coverings are positioned across part of the front of the property. The photograph captures the house in the middle of a substantial exterior project, when the finished roofing surface is temporarily absent and the underlying shape of the roof is unusually easy to see.
That mid-project view is useful for homeowners because it reveals how much geometry can be hidden by a finished roof. The rounded section at the left has to meet adjacent slopes cleanly, while the front gables rise above lower roof areas and create several visible transitions. The image does not establish why the roof was replaced or what hidden conditions may have existed, but it clearly shows that the work extended across many roof planes rather than one small isolated area.
The After photograph returns to the front of the same Richardson home after the visible roofing work is complete. A consistent finished roof now covers the rounded section, the prominent front gables, and the larger slopes extending to the right. The new surface reads as one continuous exterior element even though the roof itself is made up of many different shapes. Against the combination of brick, stone, white trim, windows, and landscaping, the roof has a cleaner and more unified appearance than the active-work condition shown in the first image.
For a homeowner considering roof replacement in Richardson, that continuity is one of the most informative parts of this Before and After set. Complex rooflines give the eye many places to notice irregular transitions. A finished replacement should be viewed not only as a broad field of roofing but also in relation to peaks, lower edges, intersecting slopes, curved or angled sections, and the exterior materials below. These photographs provide enough distance to judge the whole façade while still showing the roof shapes clearly.
The ground-level change is also worth noticing. During the work stage, roofing material, coverings, and active crew activity occupy the front of the home. In the completed view, the yard, shrubs, walkway, and front elevation are again visually unobstructed. The images therefore show more than a color change on the roof. They document the difference between a property in the middle of replacement work and the same exterior presented as a finished residential façade.
What makes this Richardson project useful as a case study is the visibility of the transformation across a complicated roof form. The photographs do not need an unsupported story about storm cause, product brand, or hidden damage to communicate the scale of the project. The Before image shows a roof replacement actively underway; the After image shows the same home with the roofing surface restored across its many visible planes. For Richardson homeowners comparing contractors or planning similar work, the pair offers a practical visual reference for looking at whole-roof consistency, clean transitions across architectural features, and how a completed roof fits back into the appearance of the home as a whole.
Siding Replacement in Richardson, TX
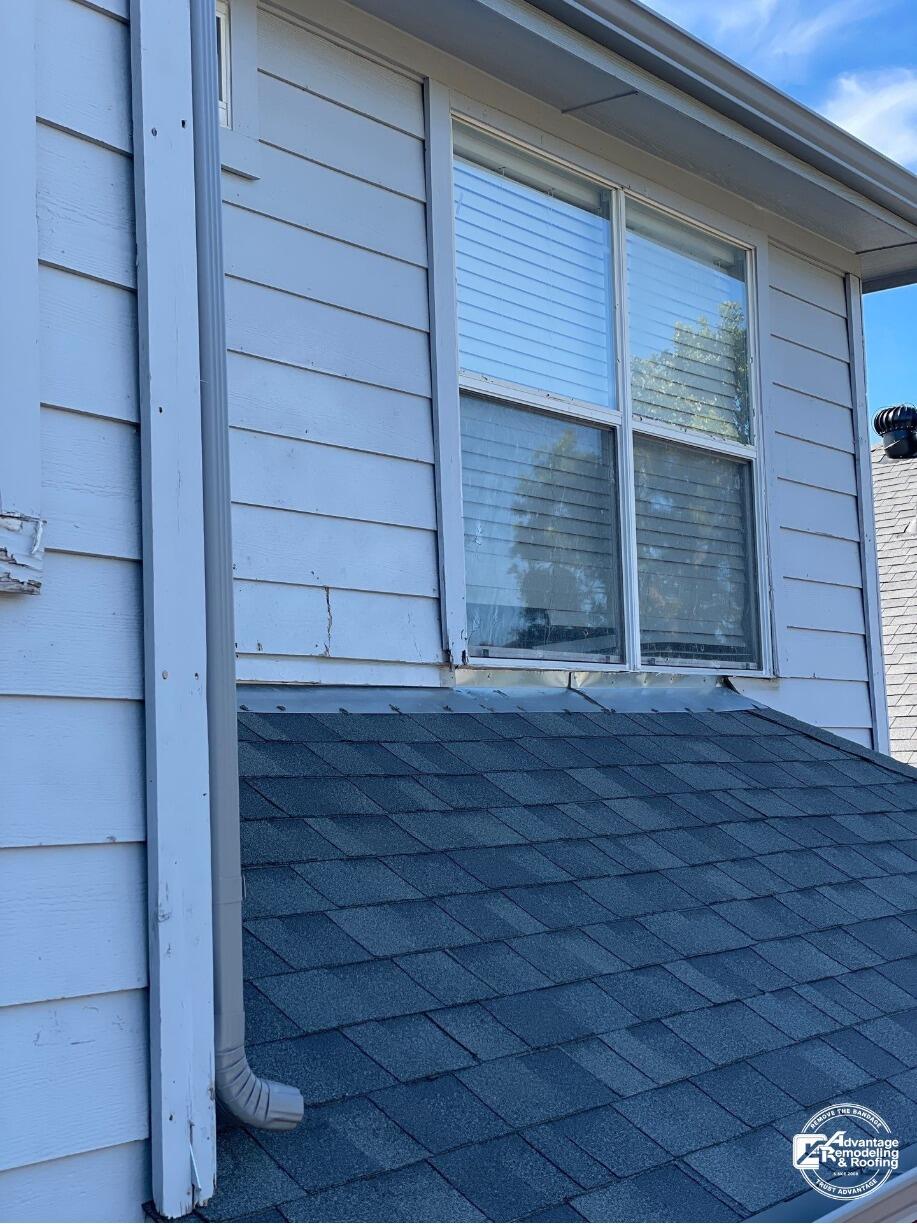
Second-story window transitions are the focus of this Richardson siding replacement. The first project photograph looks closely at a double window set into light horizontal siding above a lower shingle roof. Around the window grouping, several edges and seams have an aged or irregular appearance, especially near the lower portion of the window and along adjacent vertical trim. Because the image is tight, it draws attention to the relationship between the window, the surrounding siding, and the roof surface below rather than presenting the whole house from a distance.
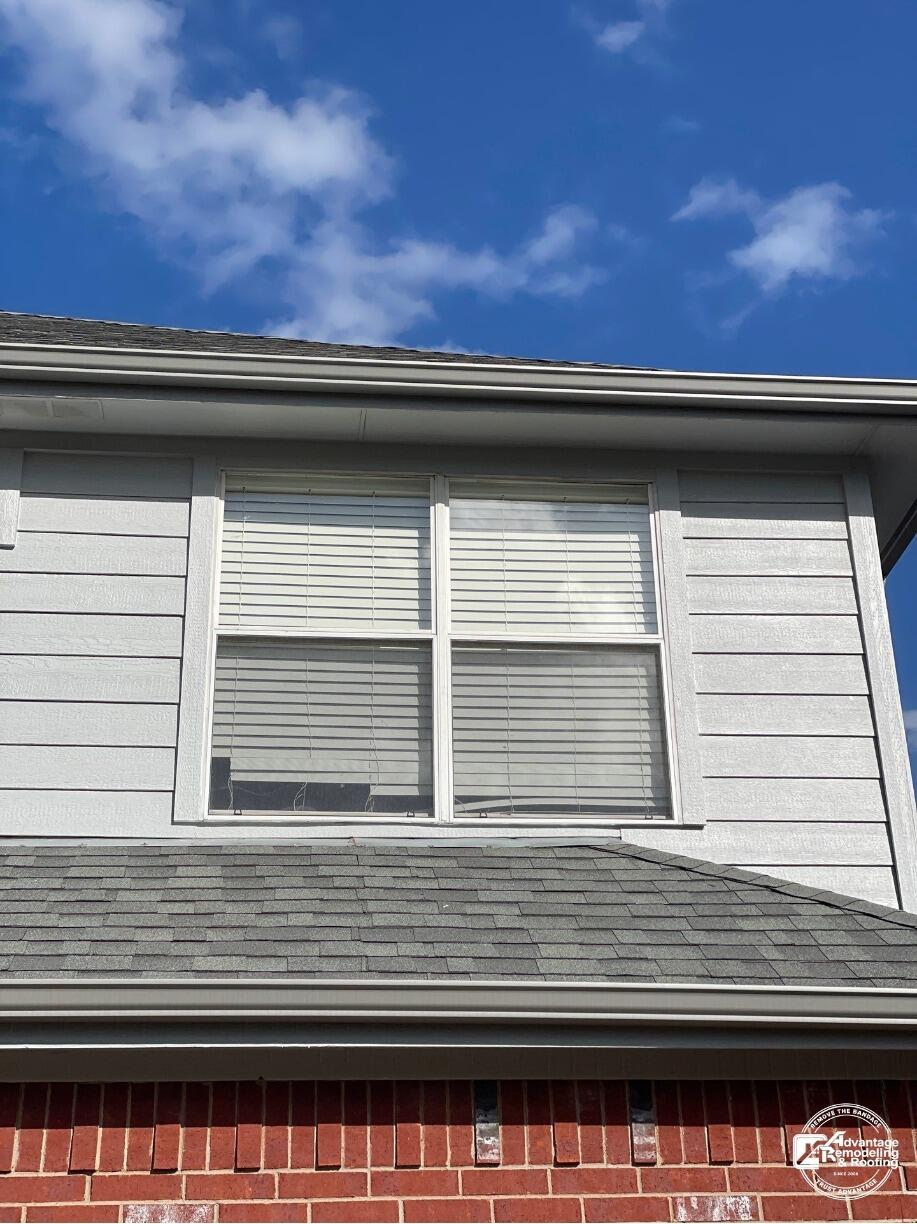
The completed view steps back and gives the same upper window area more context. Light horizontal siding surrounds the windows, and the finished appearance around the opening looks cleaner and more uniform. The lower roof and the red brick wall are visible in the wider composition, making it easier to see how the upper siding section fits into the rest of the elevation. That wider perspective is important: a siding replacement is not only about an individual panel or strip of trim, but also about how the completed area reads against neighboring exterior materials. Windows create some of the most visually detailed zones on a sided wall. Each opening introduces horizontal and vertical lines, trim boundaries, corners, and changes in plane. On a second story, those details may not be easy to inspect from the ground, yet they have a strong effect on the finished appearance of the elevation. In project photography, a homeowner can look for consistent lines, orderly transitions, and a finished surface that frames the window without looking pieced together. Those visual cues can help homeowners evaluate the craftsmanship, alignment, and completeness of the visible exterior finish.
This Richardson project is particularly useful because the two photographs are taken at different distances. The closer first view is suited to examining the window/siding/trim junction. The wider second view shows proportion and context. Together they tell a more useful story than either image would on its own. This Richardson siding replacement is concentrated around a visible upper-story window area, and the photos show how that exterior section changed in appearance.
For homeowners planning similar work, window-adjacent siding deserves careful attention during the planning conversation. It is reasonable to ask how the contractor will approach visible transitions around the opening, how the new exterior finish will relate to existing brick or roof surfaces nearby, and what the finished lines are expected to look like. Those questions keep the planning conversation centered on visible fit, finish, and the parts of the elevation that will be affected. They also help turn a broad phrase like “siding replacement” into a discussion about the specific parts of the elevation that matter to the homeowner.
The combination of brick, roofing, windows, trim, and horizontal siding in this view also shows why exterior projects can be visually complex even when the service category sounds simple. A successful-looking result has to feel coordinated with surfaces that may not be changing. In the after photograph, the upper window area reads as a more uniform composition against the red brick below and the roof plane in front. That visible integration is one of the clearest homeowner-facing takeaways from the project.
For Richardson homeowners comparing siding replacement examples, this page offers a concentrated look at one of the areas that can define the finished exterior: the space immediately around upper-story windows. The earlier view emphasizes aged or irregular edges and seams; the later view presents a cleaner, more consistent finished appearance around the same window grouping. The value of the case study is in that specific visual comparison and in seeing how the same window grouping can look more composed once the surrounding exterior finish is renewed.
Restoration and Remodeling Story: A Winter Transformation in McKinney, Texas


An unusually cold Texas winter changed the entire first level of this McKinney home after a pipe burst and water spread through the living space. The first photo focuses on the living room, where the floor has been stripped back to a rough condition and the baseboards are absent.
A white fireplace and dark accent wall remain as recognizable features, but the room around them is clearly in the middle of recovery. Water affected the whole first floor, so the restoration extended well beyond one surface.
The restoration brought several interior elements back together. New flooring and baseboards were installed, walls were painted, fresh casings were added, and a new fireplace became part of the finished room. Those pieces touch one another visually, so the result depends on more than any single material. Flooring meets trim, trim meets painted walls, and the fireplace acts as a strong focal point. The project therefore had to restore an interior composition, not simply replace what was underfoot.
Water losses can be disruptive because the area that needs rebuilding may be much larger than the place where the pipe actually failed. In this McKinney home, the entire first level was affected, which explains why remodeling and restoration work included multiple finishes. The living-room photo gives one concentrated view of that wider project, showing the difference between a stripped recovery stage and a fully finished everyday space.
The fireplace makes the Before and After comparison particularly easy to follow. In the earlier image, the white fireplace and dark wall provide a visual anchor above the unfinished floor.
In the completed room, that area has a dark stacked-stone surround that changes the focal point while the new gray wood-look flooring and bright trim organize the rest of the space. The result feels coordinated because the floor, baseboards, wall finishes, casings, and fireplace are all read together.
Insurance-claim assistance was also part of the work. That is relevant to this particular restoration because a whole-level water loss involved many interior components rather than one small repair. The physical work and claim coordination moved alongside the same restoration. The finished photos, however, keep the visible emphasis on the rebuilt living environment: new surfaces, complete trim lines, painted walls, and a renewed fireplace area.
For homeowners reviewing home restoration in McKinney, the project offers a practical way to see how connected interior finishes are after water damage. Removing flooring often exposes the bottom edges of walls and trim. Replacing baseboards affects the entire room perimeter. Painting and casing work then help those new materials meet the remaining interior cleanly. The After photo shows those transitions restored, which is what allows the room to feel complete again.
The winter setting is an important part of the story: the pipe burst during unusually cold and snowy conditions, flooding the first floor. Here, the cause was a burst pipe during unusually cold and snowy conditions, and the first floor was flooded. That event belongs to this home. The restoration that followed addressed the visible consequences through new flooring, baseboards, painted walls, casings, and the fireplace rather than leaving the living room in the stripped condition captured at the start.
Fresh casings are a small detail with a large role in a room that has been rebuilt. They frame openings and help new wall finishes meet the permanent parts of the house cleanly. In the completed living area, those bright edges work with the baseboards and gray flooring to create continuous finish lines. That consistency helps the first floor read as a connected restoration instead of a collection of unrelated repairs completed after the water loss.
Additional interior transformations may begin with very different problems, but the ending here is unmistakable. Rough floor conditions and missing baseboards give way to gray plank flooring, bright trim, finished walls, and a dark stone fireplace surround. The same room goes from a water-damage recovery stage to a coordinated finished interior, closing a first-floor restoration that began with one burst pipe during a severe winter cold spell.
Siding Replacement in McKinney, TX
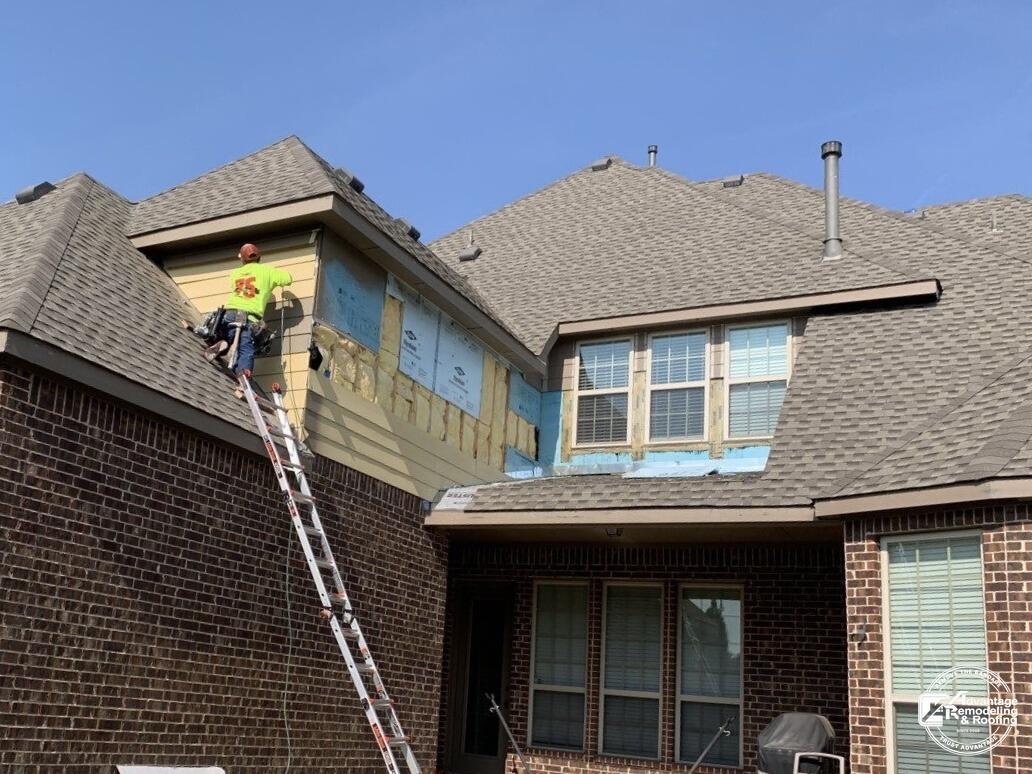
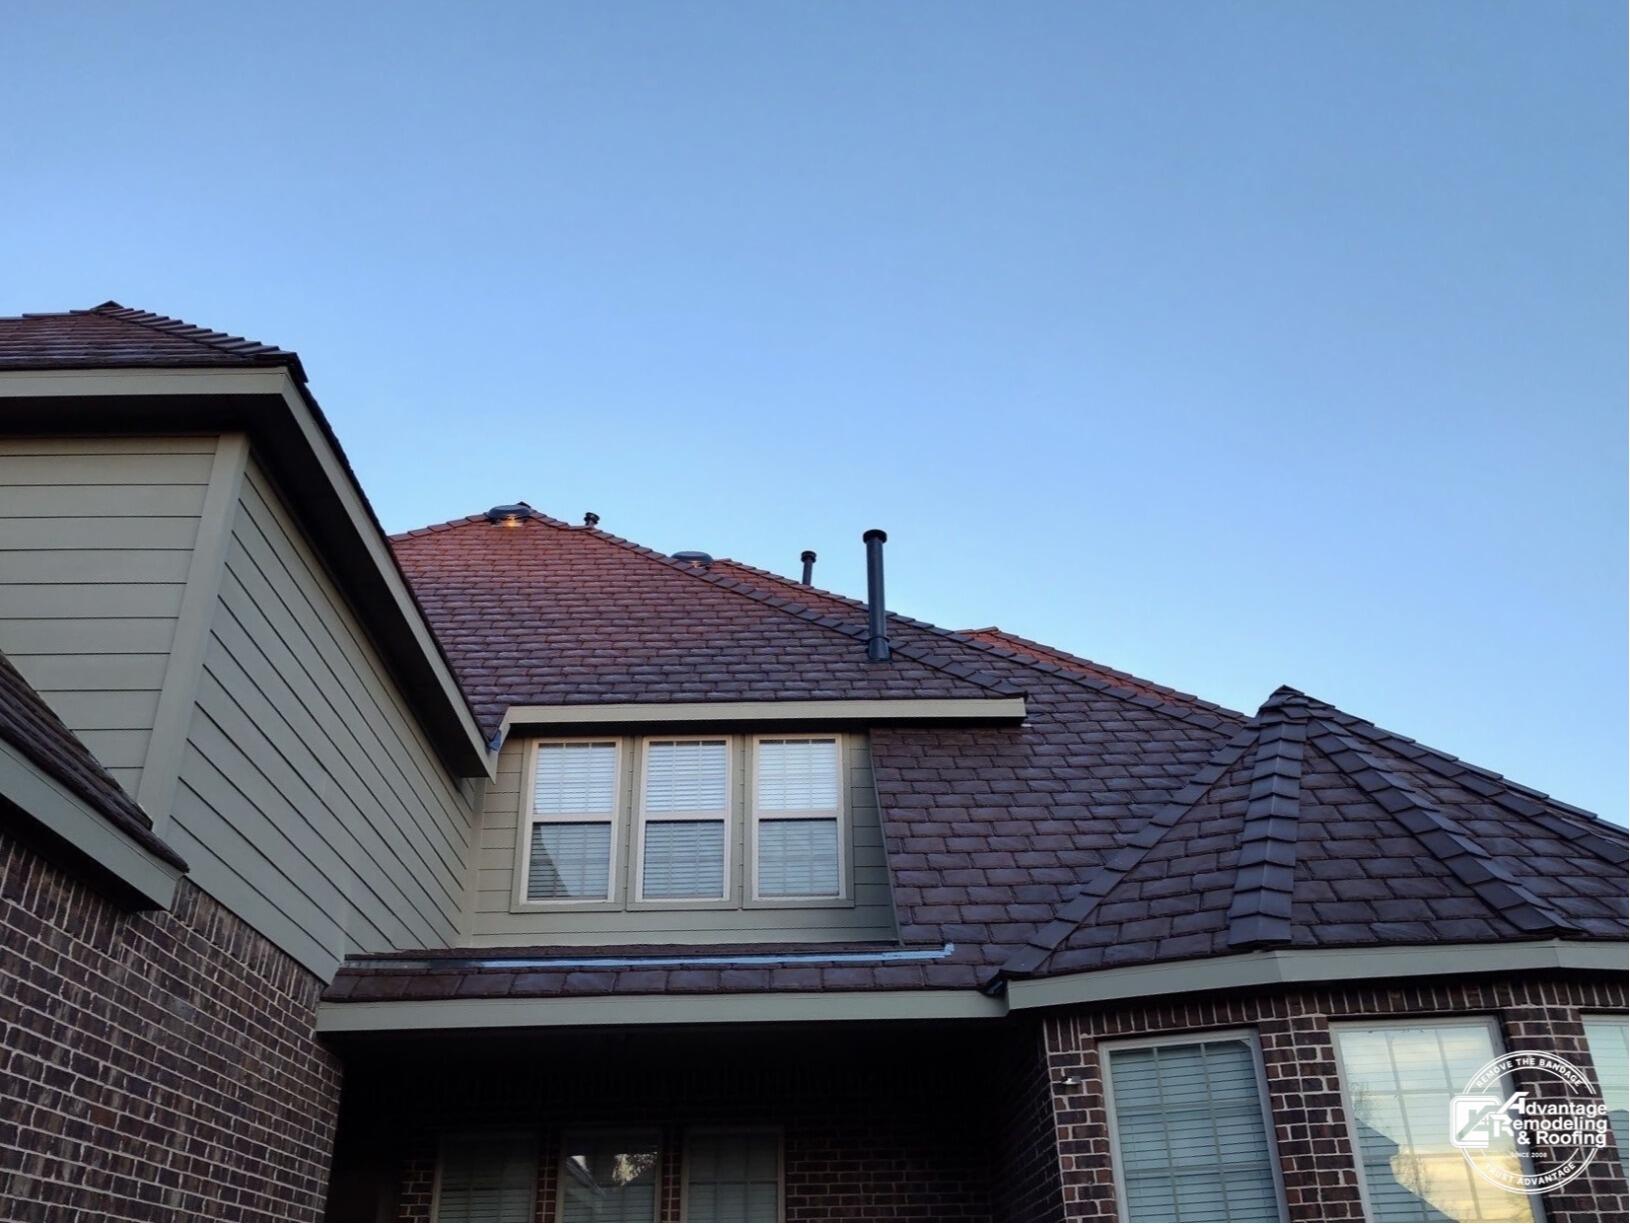
The upper story of this McKinney home provides a clear look at siding replacement while work is underway and after the exterior surface has been restored. In the first photograph, a worker is on a ladder above a brick wall.
Sections of siding around an upper projection and window grouping have been removed, exposing blue weather-resistive or sheathing surfaces along with other underlying material. The scene is unmistakably an active exterior project, and the open wall area makes the siding scope easy to locate within the elevation.
In the second view, the same general upper-story area is covered with continuous light-colored horizontal siding. The window grouping is framed by finished-looking trim, and the projection reads as a complete exterior form rather than an open work zone. The contrast is strong because the brick lower wall remains a stable reference point between the images. That makes it easier to see the visible transition in the siding area without confusing it with unrelated parts of the house.
Projects like this are useful for homeowners because they show more than a distant curb-appeal change. The in-progress photograph reveals the actual footprint of the exterior work on the upper wall. When siding is removed, the wall can temporarily look dramatically different, with layers that are normally concealed becoming visible. That open stage gives homeowners a clearer sense of the physical work involved before the upper wall returns to a continuous finished exterior.
The relationship between windows and horizontal siding is another important visual element. Window groupings interrupt the regular lines of the siding, so the trim and surrounding courses become especially noticeable in the completed elevation. In the McKinney after view, the light-colored horizontal siding runs across the upper wall and around the projection, while the window trim provides defined boundaries at the openings. For homeowners comparing siding replacement examples, those finished lines can be more informative than a distant whole-house view because the trim and siding relationships are easy to see.
The mixed brick-and-siding exterior also helps put the project in context. Many North Texas homes combine masonry on lower sections with siding on upper walls, projections, or gable areas. When only the sided portion is being addressed, the finished work still has to look visually compatible with the masonry that remains. Color relationships, horizontal lines, trim edges, and the proportions of the upper wall all affect the overall appearance. Those are general design considerations, but this McKinney project gives homeowners a real elevation on which to see them.
Upper-story siding replacement also brings access and viewing distance into the homeowner conversation. Work at this height is harder to inspect casually from the yard, so progress photographs can be especially useful for understanding where siding was removed and how the same wall section looked once the exterior finish was restored. On this McKinney elevation, the brick lower wall, upper projection, and window grouping give consistent reference points across the two views, making the visible siding transition easy to follow.
For a homeowner planning a similar project, the key lesson is to look for documentation that shows both where the siding was removed and how the same area looked once the exterior finish was back in place. That pairing can make scope easier to understand, particularly on a second story where details are difficult to inspect from the ground.
In this McKinney example, the first image shows an open upper wall with a worker on a ladder; the second shows light horizontal siding and finished-looking window trim across that same general section. It is a concrete local example of siding replacement expressed through clearly visible stages, from an open upper-wall work area to a more complete and orderly finished exterior.

