

Before & After Photos
Click on a photo to enlarge.
Roof Replacement in Prosper, TX
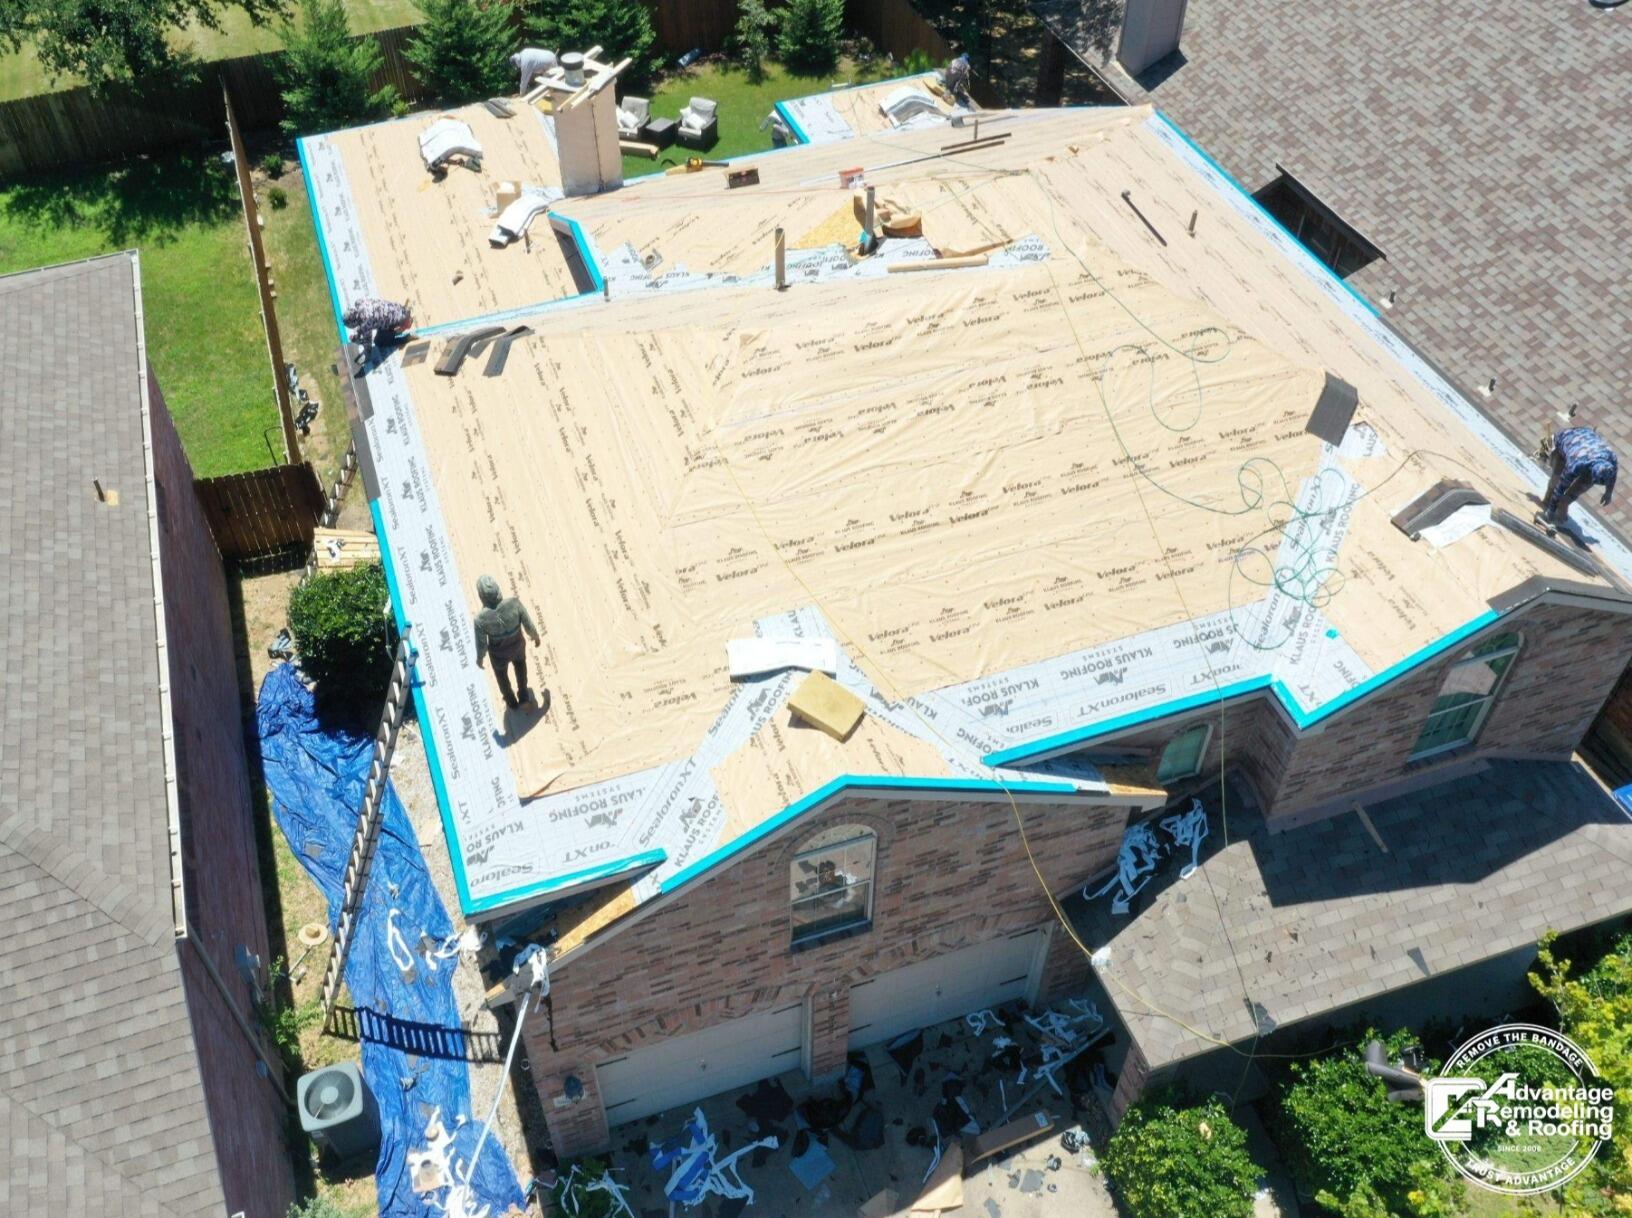
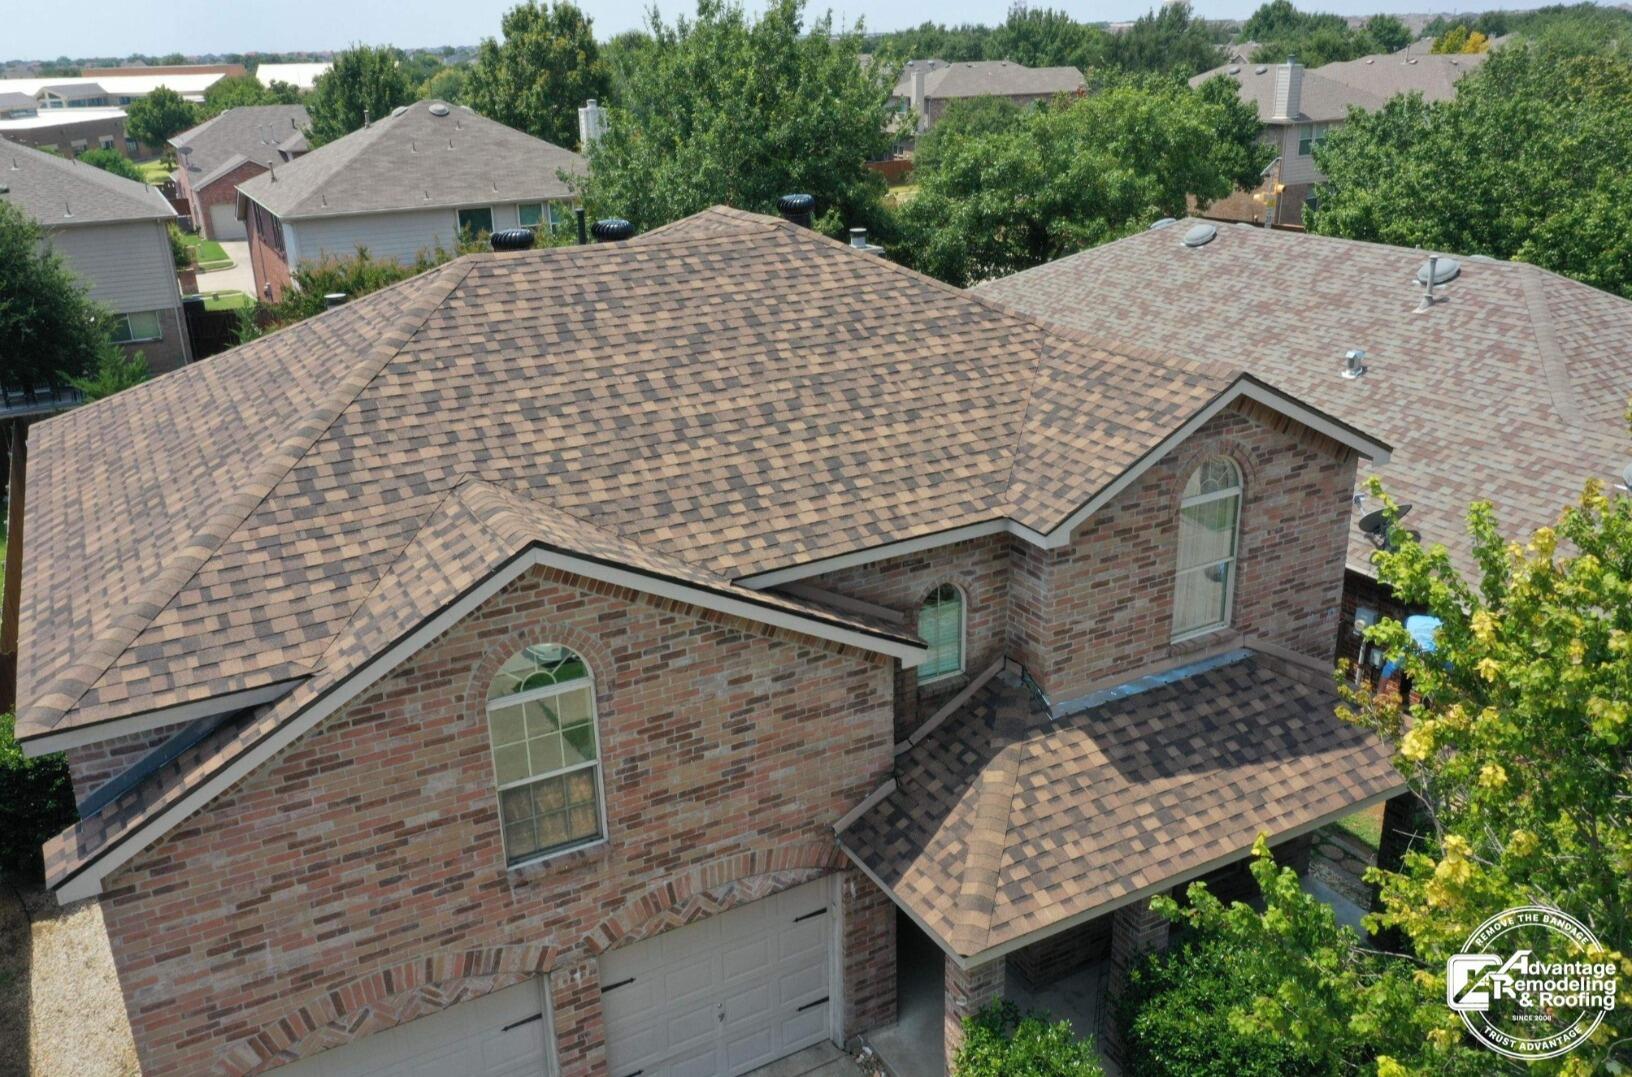
The aerial perspective is the defining feature of this Prosper roof replacement. Instead of showing only one street-facing slope, the photographs look down across most of the roof at once. That viewpoint exposes the home's broad footprint, the many connected roof planes, several changes in direction, and the relationship between the roof and the two-story brick exterior. It makes this project especially useful for understanding a replacement as a whole-roof visual system rather than a single finished section.
In the Before image, the project is already well underway. Most of the visible roof is covered by a light-colored preparatory surface, and several workers can be seen on different sections of the roof. Bright edging is visible around much of the perimeter, and project materials are present near the house below. Because the original finished roof surface is no longer covering the planes, the geometry stands out clearly: hips meet broad slopes, smaller roof sections connect to the main mass, and several penetrations interrupt the otherwise continuous fields.
That view should be read carefully. The photograph confirms an active roof replacement stage, but it does not by itself establish the exact material being installed, the condition of hidden components, or the reason the project began. What it does show very well is organization across a large roof. From above, a homeowner can see that replacement work has to address many separate planes while still producing one coordinated finished exterior.
The After image provides that completed whole-house perspective. A patterned finished roof surface now extends across the large upper sections and the lower roof areas above the garage and entry. The different planes read together instead of appearing as separate construction zones. Roof penetrations remain visible, but they sit within a continuous finished field. The warm tones of the roof also relate visually to the brick façade, while trees and neighboring homes help establish the scale of the property.
For a Prosper homeowner, the biggest lesson in this comparison is consistency across complexity. From the ground, portions of a two-story roof can be difficult to see at the same time. An elevated view makes it easier to evaluate whether the visible roof presents a coherent appearance from one side of the structure to the other. Hips, changes in elevation, roof-to-wall areas, and smaller projecting sections can all affect how the finished work looks even when no single detail dominates the façade.
The Before image also illustrates why progress photographs can be valuable during a major exterior project. A homeowner does not need to make technical conclusions from a photograph to benefit from seeing the work at different stages. Images can document what areas were open or covered, where crews were working, and how the roof looked before the final surface was in place. The completed aerial image then gives a broad reference for the visible result.
There is also a neighborhood-scale element to this Prosper project. The aerial photographs show adjacent houses, mature trees, fences, and backyards surrounding the property. That context makes the roof's size and visual presence easier to appreciate. A roof replacement changes one of the largest exterior surfaces on a home, and the effect is particularly noticeable when the entire roof can be viewed against nearby structures rather than only from a tight close-up.
This Before and After sequence succeeds because the camera angle reveals the scope visually without requiring claims that the images cannot support. The first photograph shows a multi-plane roof in an active replacement stage. The second presents the same house with a consistent finished roof extending across those interconnected sections. For homeowners researching roof replacement in Prosper, it is a strong reminder to look at the complete roof form, not just one shingle sample or one small slope, and to consider how the finished surface works with the architecture of the entire home.
Siding Replacement in Prosper, TX
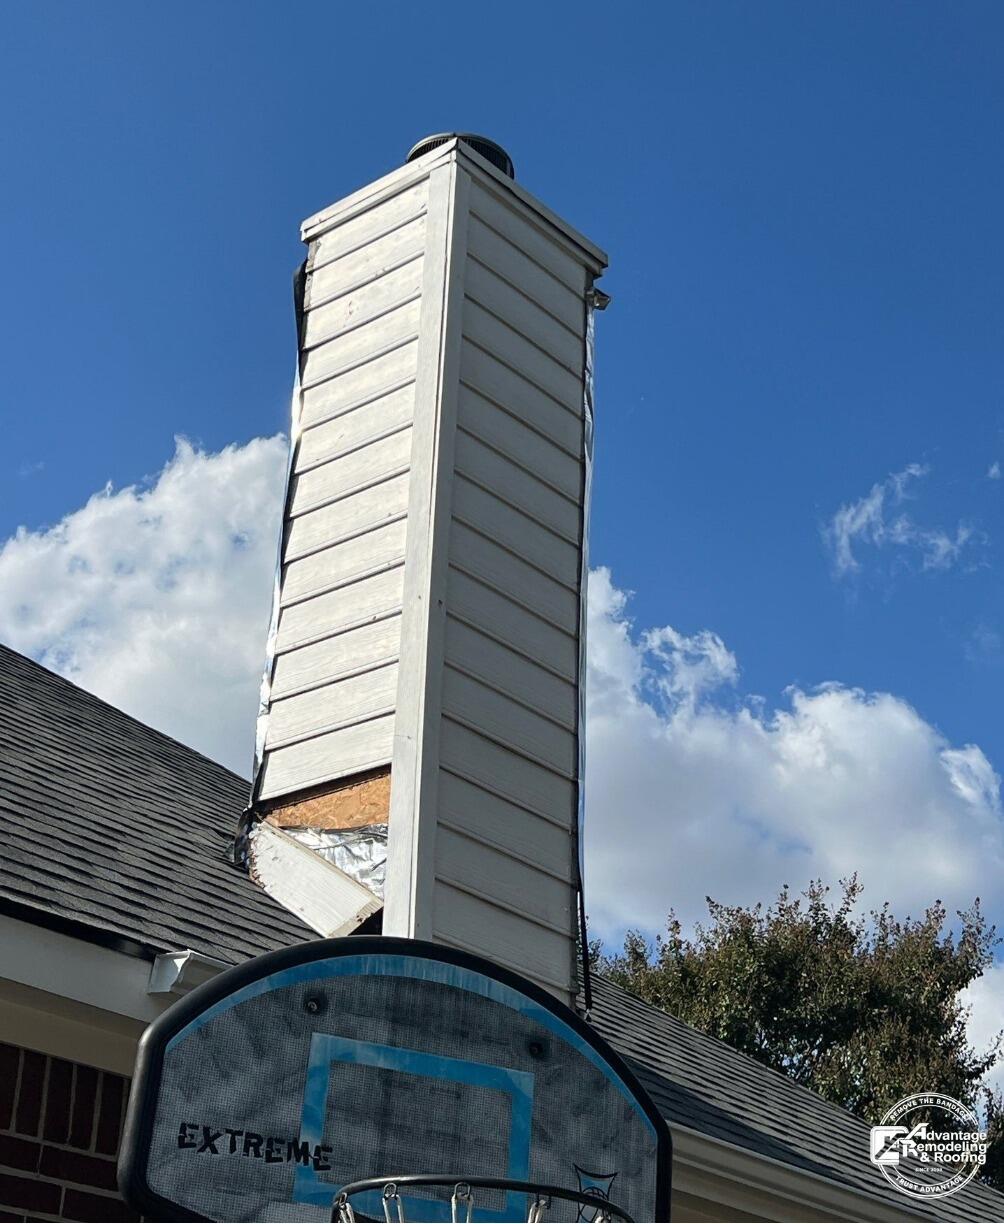
On this Prosper siding replacement project, the most revealing part of the exterior is the chimney where it rises through the roof. The first photograph shows a tall chimney clad in light-colored horizontal siding, with a section of exterior cladding missing or removed near the lower chimney-to-roof intersection. In that exposed area, underlying substrate or underlayment can be seen. Roof shingles meet the chimney on both sides, and the close view makes this junction a natural focal point for understanding the work. This Prosper project is documented as siding replacement, and the photographs place that work at a chimney where several exterior surfaces meet.
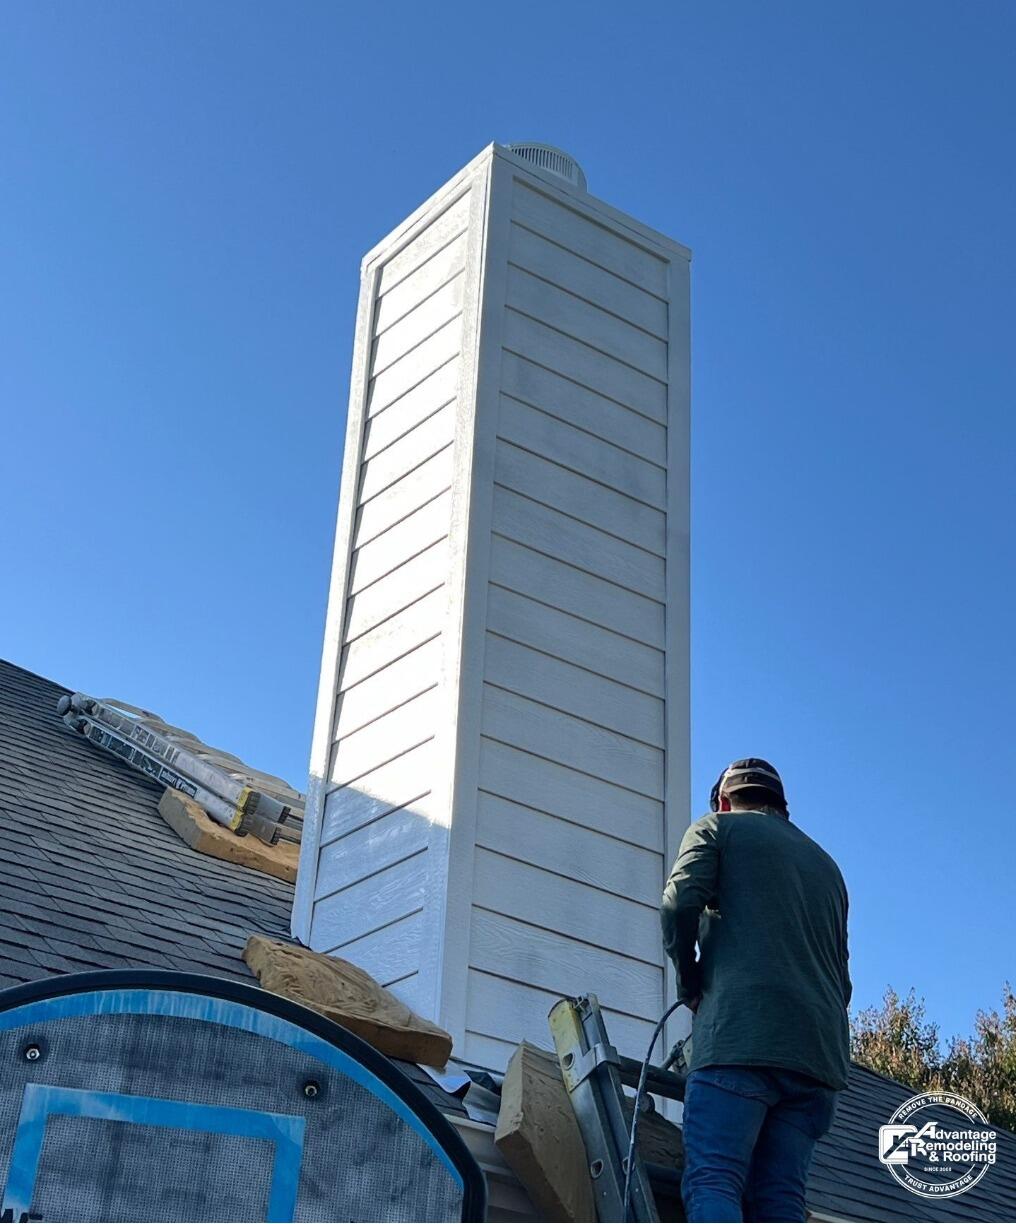
The second image shows the same chimney face with the light-colored horizontal siding extending more continuously down the wall. A worker and ladder are still visible, and nearby materials remain exposed around the roof area, so the photograph captures an active stage of the project rather than a fully cleared final scene. Even with work still underway, the visual change is easy to follow: an area that had open or removed cladding is shown with a more continuous siding surface along the chimney face.
Chimney walls are a useful place for homeowners to look closely when evaluating exterior siding because they contain multiple edges, corners, and roof-adjacent transitions in a relatively small area. Those details can make the condition of the cladding easier to notice than on a broad, uninterrupted wall. When siding is removed for replacement, the exposed stage can also make the layers behind the finished surface temporarily visible. During replacement, those layers can temporarily become visible while the exterior surface is being rebuilt, making the transition from an open work area to a finished-looking plane easier to understand.
The Prosper project also illustrates why project photos taken during the work can be informative. A polished final photograph shows appearance, while an in-progress view can show where replacement is actually taking place. Here, the lower chimney area changes from a visibly open section to a more continuous horizontal siding pattern. The worker and ladder provide context for the scale and location of the work and make the chimney siding area easy to identify within the larger roofline.
For a homeowner considering siding replacement in Prosper, a chimney like this is worth viewing as part of the larger exterior rather than as an isolated vertical box. The siding has to visually relate to the roofline, the adjacent roof surfaces, and the rest of the home. Consistent courses, clean edges, and a continuous finished surface all contribute to how integrated the chimney looks from the ground. Those are visible qualities a homeowner can compare in project photography even when product specifications are not shown.
This case study is also a reminder that “after” photography does not always mean every tool has been packed up or every adjacent area has reached its final presentation. The second image is valuable precisely because it shows the replacement taking shape while work remains active. Homeowners reviewing siding contractors can benefit from looking beyond a single beauty shot and asking to see documentation from multiple stages when available. That type of visual record can make it easier to understand which exterior area was addressed and how the appearance changed as the work progressed.
The project story is straightforward: this was a siding replacement in Prosper, TX, focused in the photographed chimney area. The first view shows an open section of cladding near the roof intersection; the second shows horizontal siding extending more continuously down that face while work remains underway. It is a focused example of how siding replacement can change the visible continuity of a complicated exterior feature and create a more orderly, connected appearance where the chimney meets the surrounding roof area.
Siding Replacement in Frisco, TX
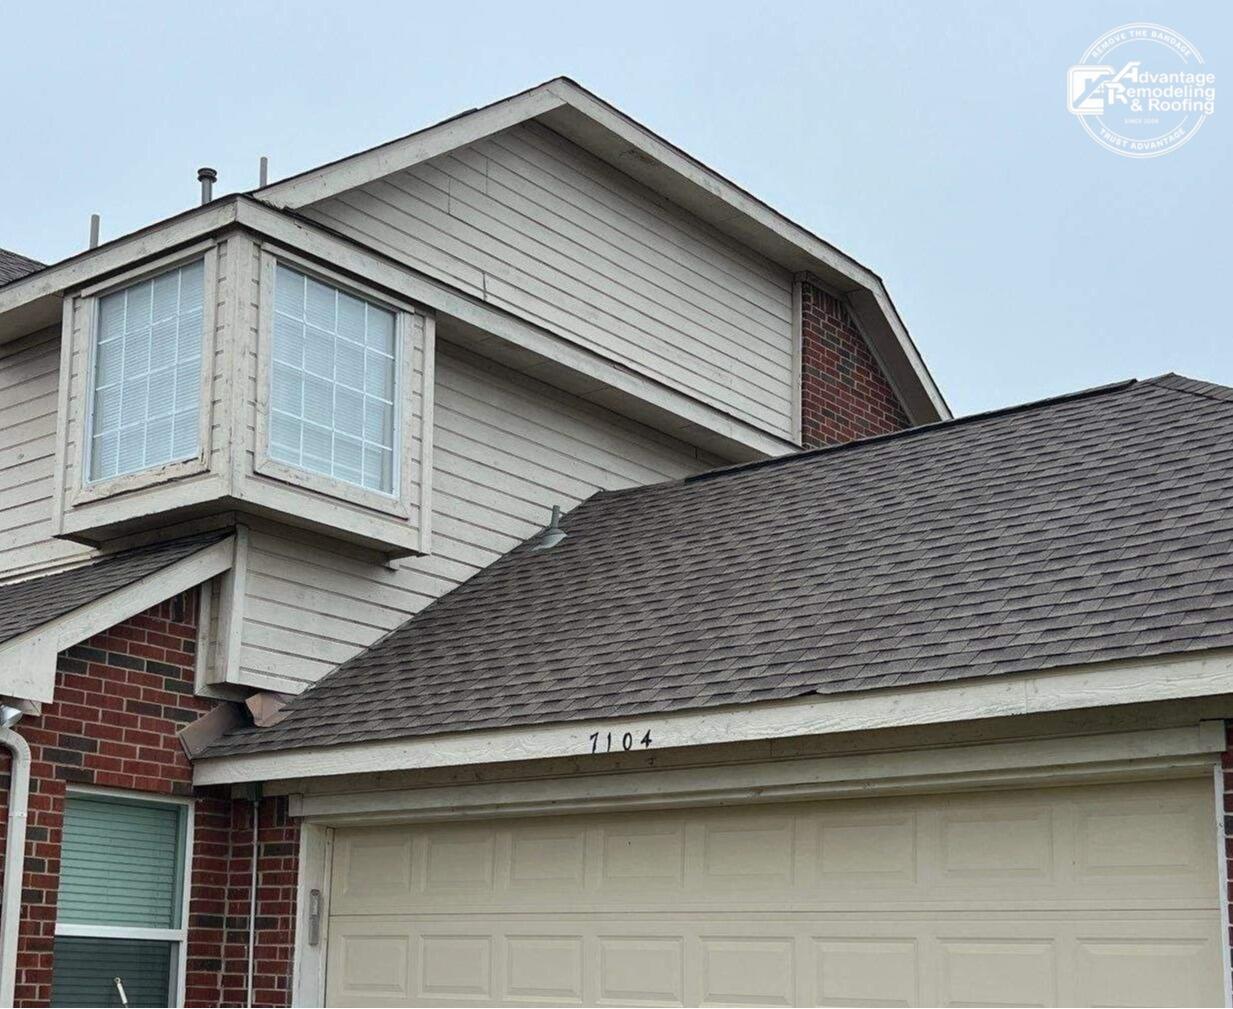
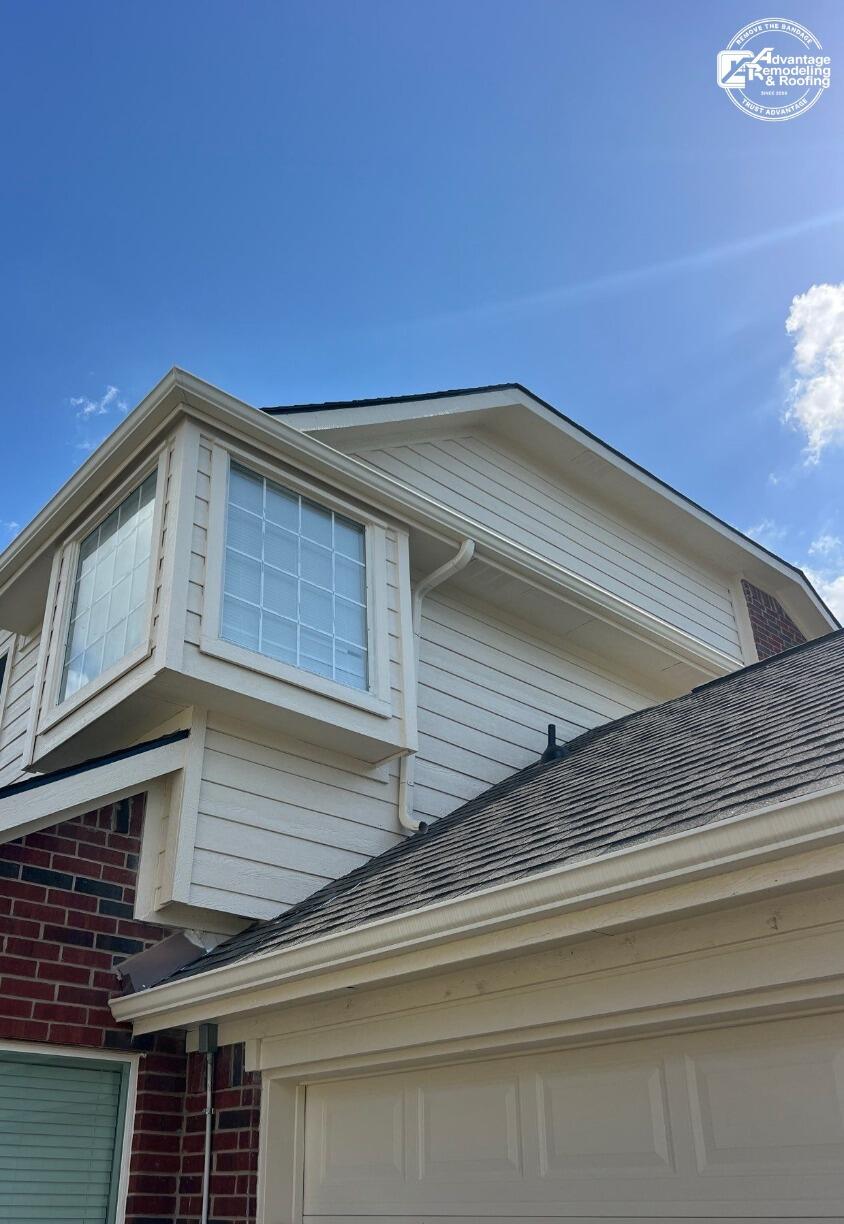
The projecting bay-window feature above the garage is the visual center of this Frisco siding replacement. In the first photograph, the two-story exterior is shown with light-colored siding around the upper projection. Several edges around the bay-window area and nearby roof or fascia line have an older, weathered, and somewhat uneven appearance. Because the feature projects outward from the main wall, its corners, trim lines, and surrounding siding are especially prominent from the ground. The second photograph returns to the same bay-window and gable area after the visible exterior work. The light-colored siding and trim appear cleaner and more uniform, and the edges around the projection and adjacent upper wall look more consistently finished in the photographed view. The overall geometry of the house has not changed; what changes is the presentation of the surfaces defining that upper architectural feature. That makes the project a useful example of how siding replacement can refresh a specific focal area of a home rather than only being understood as a whole-house transformation.
Bay windows and other projections create multiple planes. Instead of one flat wall, the exterior turns around corners and meets trim at several angles. Those transitions naturally attract attention because light and shadow emphasize them throughout the day. For homeowners considering siding replacement in Frisco, a project like this provides a practical reference for evaluating visible lines around projections, corners, and adjacent upper-wall details. The photographs make that appearance comparison easy because the same projecting feature remains the visual reference point in both views. The location above the garage also matters from a viewing standpoint. This is an area many homeowners and visitors see every time they approach the driveway. A weathered or uneven-looking finish around a prominent upper feature can stand out even when the rest of the elevation is relatively simple. Conversely, consistent siding and trim around the same feature can make the upper section feel more deliberate and cohesive. Curb appeal is subjective, but project photography lets homeowners decide for themselves whether the visible change matches the kind of exterior result they are looking for.
When reviewing siding replacement examples, it can be useful to focus on repeatable visual questions. Do the horizontal courses look consistent across the visible wall? Are corners and trim boundaries clearly defined? Does the completed area relate naturally to nearby rooflines, windows, and fascia? Does a projecting feature look integrated with the surrounding elevation rather than visually disconnected? These are practical homeowner considerations, and the Frisco bay-window project gives a clear photographed area in which to apply them. Another benefit of a focused case study is that a specific architectural feature can tell the story clearly. This is siding replacement in Frisco, and the images show the bay-window/gable area before and after the visible exterior change. The earlier view has an aged, less even appearance at several edges; the later view presents cleaner, more uniform siding and trim around the same feature. That visual change documents a meaningful exterior transition at one of the home’s most noticeable upper-story features, especially from the driveway and front approach where the projection naturally draws the eye.
For Frisco homeowners with upper-story projections, bay windows, or mixed roof-and-wall geometry, this project is a relevant local example to keep in mind when discussing siding replacement. Architectural features with many edges can make finish quality highly visible, so it is worth asking a contractor to explain how those areas are included in the proposed scope and to show comparable project photos when possible. The clearest takeaway is visual and direct: a prominent upper bay-window area moved from a weathered, uneven-looking presentation to a cleaner and more consistently finished exterior appearance.
HVAC unit replacement in Plano, TX


The HVAC replacement at this Plano home became part of a broader storm-restoration project rather than starting as a stand-alone equipment upgrade. After a major hailstorm, the homeowner called about leaking and interior water-damage concerns.
A 15-point inspection then identified hail damage on the HVAC equipment as well. That additional finding expanded the scope beyond the areas that first prompted the call and led to replacement of the entire HVAC system, including both indoor and outdoor units.
The photographs focus on the equipment outside. In the Before image, two older condenser units sit beside a brick wall and fence. Their side-yard location makes them easy to compare with the finished condition because the wall and surrounding service area stay recognizable. In the After image, a single new light gray Lennox condenser is visible on the pad, with a technician present during service work. The exterior photo shows the yard-side equipment, while the project scope also included replacement of the indoor unit.
That difference between visible and nonvisible work is common with home mechanical systems. The outdoor condenser is easy to photograph, while other components are located inside the house. Homeowners considering HVAC replacement should understand that a Before and After image may highlight only one part of a larger system. On this Plano job, the outside change is the visual marker for a replacement that extended beyond the yard.
The 15-point inspection mattered because the HVAC damage was not the homeowner's only concern. The initial call involved leaking and interior water damage after the hailstorm. Inspection then added the mechanical equipment to the restoration scope. The inspection broadened this restoration from the areas first reported by the homeowner to the HVAC equipment as well.
Insurance coordination was part of the same project, and the HVAC replacement was handled under the same hail-storm claim and deductible. That history explains why the mechanical work was connected to the broader restoration instead of treated as an unrelated purchase. In the photographs, the visible transition is straightforward: older outdoor equipment at the start, followed by the replacement condenser in the established side-yard service area.
For a homeowner, the setting around outdoor HVAC equipment also matters. Condensers live close to exterior walls, fences, landscaping, and access paths, so replacement work takes place within an already defined space. The Plano images keep those surroundings visible. The brick wall and fence act as fixed references, making it easier to see that the equipment changed while the surrounding property layout remained the same.
Local readers exploring storm restoration and remodeling in Plano can use this project to see how one event may involve more than roofing or interior finishes. Here, hail damage identified during the inspection reached the HVAC system, and the replacement included equipment inside and outside the home. The outdoor unit is simply the portion of that broader work captured in the image pair.
The technician visible beside the new outdoor unit adds another useful scale reference. The condenser is not a small accessory; it occupies a substantial part of the service area next to the brick wall. Seeing a person beside it helps a homeowner understand the physical size of the equipment change and why access around the pad matters during installation and service, even though the indoor portion of the replacement is outside the camera view.
By completion, the older condensers no longer define the side-yard view. A new light gray Lennox unit occupies the visible service area beside the brick wall, closing the exterior portion of the HVAC transformation. What makes this job distinctive is the sequence: a hailstorm, an inspection prompted by other property concerns, identified HVAC damage, and a full system replacement within the same restoration effort.
Complete roof replacement in Plano, TX
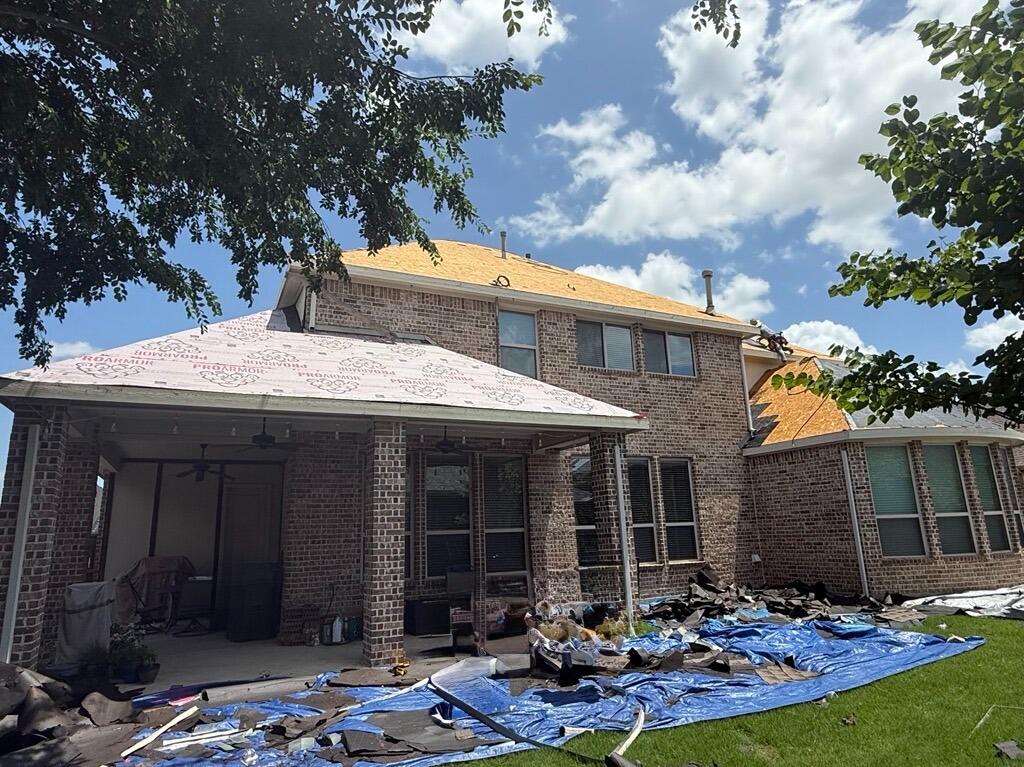
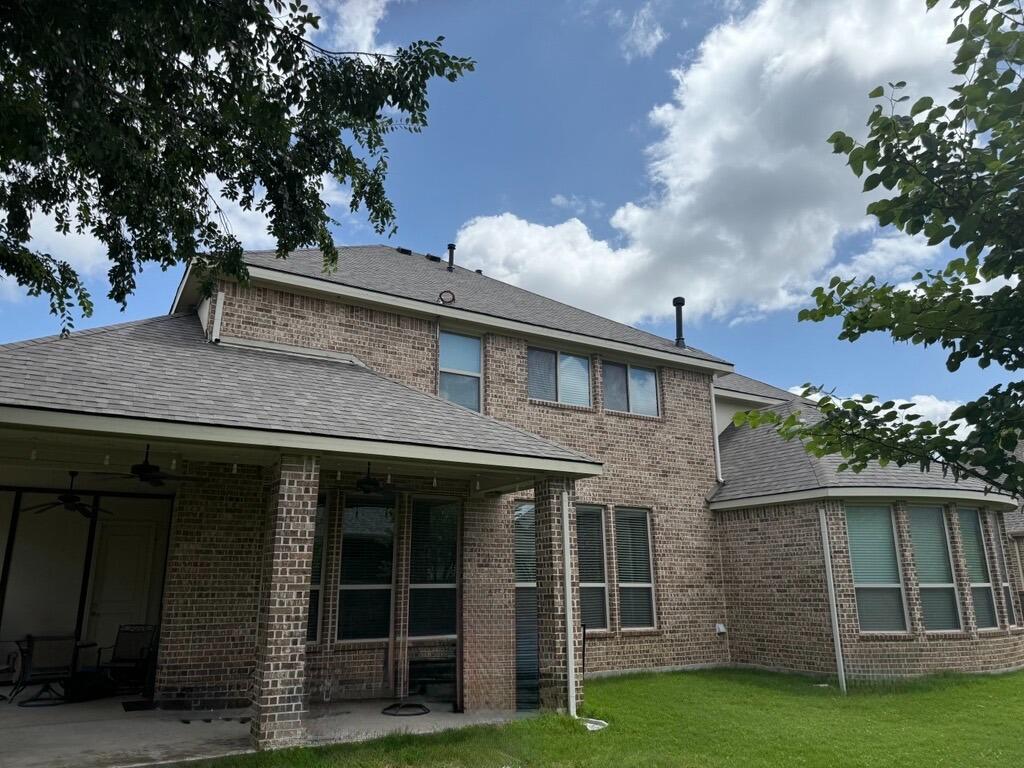
Complex roof geometry is the defining feature of this Plano replacement. From the rear of the home, the roof breaks into numerous intersecting planes, changes in height, and angled sections rather than one broad uninterrupted slope. The Before photo was taken during active replacement, so the geometry is even easier to see: decking and underlayment are exposed across multiple areas, and tarps, boards, and other jobsite materials are visible below. The house is temporarily stripped of the visual uniformity that a finished roof normally provides.
That construction-stage view helps explain the scale of a complete reroof. Each visible plane is part of the same overall system, even though valleys and ridges divide the surface into many shapes. The work covered the entire roof rather than one localized repair, which meant the finished roofing had to carry consistently across the intersecting sections. Homeowners comparing complete roof replacement projects can see the difference most clearly on a roof like this, where many separate-looking sections ultimately have to read as one roof.
The Before condition also shows how much temporary activity can surround a reroof. Materials are staged around the rear yard, and exposed roofing layers make the home look unfinished for the duration of the work. That stage can feel visually busy because the project is spread across both the roof and the ground. The photo captures that reality without disguising it: replacement is underway, several planes are open, and the yard is supporting the work above. In the After photo, the same architectural complexity remains, but the visual noise is gone. Gray shingles now cover the intersecting roof planes, and the roof reads as a continuous finished surface despite the many angles. The rear elevation, windows, walls, and overall geometry stay recognizable from the first image, making the change in roofing condition easy to isolate. The yard below is also cleared, creating a much calmer endpoint than the active work scene.
Cleanup was an important part of this Plano project, including attention to nail removal around the property. That is a meaningful part of a full replacement because tear-off produces activity well beyond the roof edge. The finished job should not be judged only by the last shingle installed overhead; the condition of the surrounding property matters too. Here, the cleared yard in the After photo visually supports the completed cleanup after installation.
For homeowners with multi-faceted rooflines, the project offers a useful way to think about continuity. A roof may appear to be a collection of separate sections from the ground, but replacement work must follow all of those intersections. The final gray surface on this home connects the planes without erasing the architecture that makes the roof distinctive. Local readers considering roofing work in Plano can use the photos to see how a complicated rear roofline changes through a full reroof.
The contrast between images is especially strong because the first photo was taken in the middle of construction rather than before any work started. Exposed decking and underlayment reveal the roof in layers; the final image hides those layers beneath the completed surface. That progression makes the finished roof easier to appreciate as the endpoint of a larger process involving removal, exposed sections, installation across numerous planes, and cleanup below.
By completion, the roof has not become simpler in shape, but it has become visually unified again. The same ridges, valleys, and intersecting planes are still present, now covered by consistent gray shingles. The work materials have disappeared from the yard, and the rear of the house returns to a settled appearance. For this Plano home, that combination of multi-plane continuity and a cleared work area is the clearest measure of the completed transformation.

